Showing posts with label Adsense. Show all posts
How to Display Adsense Ads Based on Article Authors

How to Display Adsense Ads Based on Article Authors

How to Display Adsense Ads Based on Article Authors - Blogging tips this time about how to make Adsense ads appear based on article writers in a blog. In the sense, Adsense ads will alternate appear according to the author of the article along with the ad slot installed by the blog owner based on the ad slot slot that has been determined. This trick is usually used on blogs that have multi-user or multi-admin, or also blogs that provide the opportunity for guest writers (contributors) to write several articles on the blog.

How to display Adsense ads alternately based on the author of this article can be applied to the Blogger and Wordpress platforms. Wordpress itself has many plugins that can be used to provide access as intended, which is usually configured on the user role. However, it's different with Blogger, to make this kind of thing we are only limited to using conditional tags. However, that alone is very helpful for blog admin / webmaster to share income with guest writers or contributors on his personal blog.

How to Display Adsense Ads Based on Article Authors

So, actually this should be the initiative of the blog owner himself. That he wants to share his Adsense income with contributors or guest writers on his blog. This is also intended to give more encouragement to guest writers and provide income opportunities for them to be more diligent in updating articles on the blog. Especially for bloggers who have not been successfully accepted as Google Adsense publishers.

How to share Adsense ads that will be displayed alternately based on the article writer?


To apply this trick, the blog owner (who is also the owner of an Adsense account) uses the Channel feature contained in the Adsense account. That is, the blog owner must create an ad slot for each of the existing contributors. Then the ad slot is created again in a Channel.

This needs to be done so that it is easy to calculate the distribution of results obtained by each contributor / guest writer. Speaking of the sharing of results, because the ads displayed are the property of the blog admin, then the distribution of advertising results should be discussed first. Until you get a consensus that benefits each other.

How to find out the amount of income earned if you use this trick?


In this case, the contributor must trust the blog admin, and the blog admin should provide income reports in a certain vulnerable time. Whether it's every day, a month 3 times or once a month, or according to the agreement and user role that has been determined.

How to display ads according to the author's post / article writer


Well, to display ads alternately according to the article author, the way is very easy. We only need to use conditional tag author, both for Blogger or Wordpress. The following are examples of their use:

Example of using Blogger's special conditional tag author:

<b:if cond='data:post.author == &quot;KhalistaBlog&quot;'>
HERE ADSENSE ADVERTISING CODE
</b:if>

Examples of using Wordpress-specific conditional tags:

<?php if (is_author( 'KhalistaBlog' )) { ?>
HERE ADSENSE ADVERTISING CODE
<?php } ?>

From the example of using the conditional tag author above, if articles / posts are written by "KhalistaBlog", then the Adsense ads that appear are Adsense ad slots contained in the Channel author. This also applies to posts / articles belonging to other authors.

Do not forget, if the ad slot wants to be displayed under the post or in the post, then the ad code must be parsed first.

Easy enough isn't it?
This is the information about how to display Adsense ads based on author posts or article writers. Hopefully useful and good luck.
How to Hide AdSense on Blog Search and Label Pages

How to Hide AdSense on Blog Search and Label Pages

How to Hide AdSense on Blog Search and Label Pages - Running ads on the search label page and especially search blog posts, is an action that is very risky for the health of Google Adsense accounts. You might get an Adsense account banned. Because, we as blog / website owners can not control the fad of visitors who can modify the label search URL, and enter the keyboard search page, with keywords that have nothing to do with blog content, and even tend to be inappropriate.

How to Hide AdSense on Blog Search and Label Pages

Even more so if visitors are angry because of family problems or because of debt problems, and vent their anger on the Adsense account installed on our blog, through the blog search column (data:blog.searchQuery) or modify the URL label search page link (data:blog.searchLabel) becomes something that smells of adult keywords or 18+.

For example, the blog URL from the results of visitors when using the blog search widget, it will be like this:

https://setupgaming.blogspot.co.id/search?q=download+video+meler+mp3.5

Or if the blog label page's search URL is modified, it will look like this:

https://setupgaming.blogspot.com/search/label/Download%20Video%20meler&amp;max-results=8

download+video+meler+mp3.5 and Download%20Video%20meler is a keyword that is inappropriate for the results of blogging. Whereas obviously the blog discussed about the setup of cheap gaming laptops. In fact modified into something slimy.

Attention: Keep in mind, even though the keyword search blog page and URL of the search labels page are not contained in the blog content, the page will not be redirected to page Error 404. He will still open on his own page.

On the other hand, displaying Google Adsense ads on blog article search pages, it should not be necessary. Because there is no effective content on the page. If a blog page does not have effective content, then the page is not suitable to display Adsense ads. Apply the following ways to keep your Adsense account from being banned, before it's too late.

How to hide Adsense ads in the header, sidebar or footer if you use the HTML/JavaScript Widget


1. Make sure you already know the HTML ID for the Adsense ad code widget on your blog. That is by going to Layout, click edit on the HTML / JavaScript widget that contains the ad code.

In this tutorial, suppose the attribute ID for your Adsense ad code is "HTML2"

2. After that go to Theme >> Edit HTML, look for the "HTML2" code. The trick press the ctrl + f key then type "HTML2" in the search field that appears, then press enter.

How to hide Adsense ads in the header, sidebar or footer if you use the HTML/JavaScript Widget

3. In the HTML2 ID attribute, find the code <b:includable id='main'> then put the following conditional tag code under the code:

<b:if cond='data:blog.pageType == &quot;index&quot; and data:blog.url != data:blog.homepageUrl'>
<b:else/>

4. Still on the same attribute ID, find the code <b:includable> then place the closing code of the following conditional tag just above the code:

</b:if>

So that for steps 3 and 4, the method of implementation will look like in the following picture:

How to hide Adsense ads in the header, sidebar or footer if you use the HTML/JavaScript Widget

5. After that Save the Theme.

How to hide the Adsense ad code inside the HTML template


Even though in the HTML theme, this type of advertisement is always displayed in all pages, such as Ads Page Level ads, or floating ads.

1. The trick is easier than the one before, which is to stay like this:

<b:if cond='data:blog.pageType == &quot;index&quot; and data:blog.url != data:blog.homepageUrl'><b:else/>
Adsense ad code is placed here….
</b:if>

2. After that Save the Theme.

Actually there are still other ineffective pages for Adsense ads, such as the 404 Error page and static pages. If this page is combined with a blog search page and label search, the way to implement it will be like this:

<b:if cond='data:blog.pageType == &quot;index&quot; and data:blog.url != data:blog.homepageUrl'>
<b:else/>
<b:if cond='data:blog.pageType != &quot;static_page&quot; and data:blog.pageType != &quot;error_page&quot;'>
Adsense ad code is placed here…
</b:if>
</b:if>

Or if you want to keep showing ads on static pages, and don't want to display ads on the blog search page, search label, and 404 error page page, then the way to implement it will be like this:

<b:if cond='data:blog.pageType == &quot;index&quot; and data:blog.url != data:blog.homepageUrl'>
<b:else/>
<b:if cond='data:blog.pageType != &quot;error_page&quot;'>
Adsense ad code is placed here…..
</b:if>
</b:if>

Anyway, just play your Conditional Tag, according to the concept you want. Until now, the way to hide Adsense ads above is still 100% effective to avoid banned Adsense ads from the things mentioned above.

As an additional note, the above method can not only be applied to Google Adsense ads, but other ads. It's just that Adsense is more stringent, so the focus is on Adsense.

That's the tutorial that I can share about How to Hide AdSense Ads on Blog Search and Label Pages. Hopefully it can be useful and good luck.
How to Overcome Google AdSense Rejection Due to Navigation Problems

How to Overcome Google AdSense Rejection Due to Navigation Problems

How to Overcome Google AdSense Rejection Due to Navigation Problems - This time I will review one of the common problems that often occur about Google AdSense Rejection Due to Navigation Problems. Besides being inadequate content, site navigation issues are often a problem with Google Adsense rejection. Unfortunately, many bloggers do not understand what is meant by rejection due to site navigation problems.

How to Overcome Google AdSense Rejection Due to Navigation Problems

Causes of Google AdSense Rejection due to Navigation Problems


In general, there are several reasons and reasons why Google AdSense is related to the navigation problem of this site starting from:

  • Google found the site difficult to explore both by Crawlers and readers
  • The menu navigation is unclear
  • Menu navigation is not User Friendly, meaning it is not friendly to readers / visitors (confusing)
  • There is a broken link on the menu navigation
  • The URL of the destination page is empty menu navigation
  • Excessive pop-ups
  • Violate the rules and policies of the Google AdSense program
  • The page behind the login / access process is restricted
  • Dialers Program
  • The site's unpreparedness for submission to AdSense
  • Pages that are being created or not yet launched

From a few points above, maybe what is a little confusing is the excessive Pop-up problem. Because in fact, Google does not provide further clarification about this Pop-up problem, whether it is a Pop-up, redirect link or other advertising.

Overcoming Google Adsense Rejection Due to Navigation Problems


Personally, to be honest I have never experienced this problem because what I most often experience is being rejected by AdSense because the content is inadequate. Furthermore, if your site is rejected by Google AdSense because of problems with site navigation, there are several efforts that you can do, including:

  • The site must be easy to explore, both by Crawler and readers
  • Site navigation must be clear and not confusing
  • All page URLs targeted at site navigation contain active URLs and have articles in each category
  • Avoid, replace, or change the damaged URL in the site navigation menu
  • As long as the website is submitted to AdSense, avoid the redirect URL (URL Redirect) he other pages
  • Avoid using the Dialers Program
  • Make sure all URLs are active and nothing is damaged

Then you also have to be willing and able to comply with all AdSense rules and policies and review whether the site is ready for Google AdSense or not at all. That is what is the reason why your site was rejected by Google AdSense because of navigation problems and how to overcome and fix it. So a few tips that are quite short from me, hopefully useful and good luck.
How To Add Adsense Ads In The Post With Callers Using JavaScript

How To Add Adsense Ads In The Post With Callers Using JavaScript

How To Add Adsense Ads In The Post With Callers Using JavaScript - In this trick you will place the Adsense ads in the post with the caller. With this trick then we can save Adsense ads anywhere in the post according to our will. Actually this is almost the same as how to save Adsense ads in the post manually, only here we do not store the ad code directly in the post, but we only save the caller code only.

So with this we can easily replace ad units or replace ads with other accounts without having to edit the posts one by one. We just need to replace the ad code in HTML edit only.

Actually on Google has many articles that discuss how to store adsense ads in the post automatically, but there are some bloggers who feel uncomfortable with the way because of the placement of ads in the post out of our control in full.

How To Add Adsense Ads In The Post With Callers Using JavaScript

For that you can try this trick, so the ads will appear in accordance with our will. To start trying to save Adsense ads in the middle of posting with this caller, For more details can directly follow the steps below.

How To Add Adsense Ads In The Post With Callers Using JavaScript


Go to Blogger >> Settings >> click the Theme menu >> Edit HTML, Then, place the following code, above the code </body>

<script>
//<![CDATA[
var element = document.getElementById("insertad");
element.innerHTML = "<ins class='adsbygoogle' data-ad-client='xxxxxxxxxxxxx' data-ad-format='auto' data-ad-slot='xxxxxxxxx' style='display:block'></ins>";
var newScript = document.createElement("script");
var inlineScript = document.createTextNode("(adsbygoogle = window.adsbygoogle || []).push({});");
newScript.appendChild(inlineScript);
element.appendChild(newScript);
//]]>
</script>

Please replace the code I marked with such code from your Adsense ad code. Notice each quotation mark of the ad code with single quotes instead of double quotes.

Then please use this code to call ads, please save in the post as you want in the mode of posting HTML.

<div id="insertad"></div>

If you want to save another ad, please create again the code above with a different caller ID. You can use the following code for the second ad.

<script>
//<![CDATA[
var element2 = document.getElementById("insertad2");
element2.innerHTML = "<ins class='adsbygoogle' data-ad-client='xxxxxxxxxxxxx' data-ad-format='auto' data-ad-slot='xxxxxxxxx' style='display:block'></ins>";
var newScript2 = document.createElement("script");
var inlineScript2 = document.createTextNode("(adsbygoogle = window.adsbygoogle || []).push({});");
newScript2.appendChild(inlineScript2);
element2.appendChild(newScript2);
//]]>
</script>

And use this code to call the second ad, please save it in the post as you wish in the HTML posting mode.

<div id="insertad2"></div>

Done, and you can see the results.

That's the tips I can share, about How To Add Adsense Ads In The Post With Callers Using JavaScript. Hopefully with articles that I have shared above can be useful and useful for you all. Good luck.
Tips and How to Overcome Adsense Click Bombs

Tips and How to Overcome Adsense Click Bombs

Tips and How to Overcome Adsense Click Bombs - One of the most important things that can boost our totality in maintaining the existence of the whole blogging art is to have an AdSense account and run it to commercialize the site or blog that we have in order to get additional sustenance so that we are tired of being completely paid off.

In the midst of harmony in partnership with Google AdSense, there is a phenomenon that is not uncommon and this can be a threshing spirit of the blogger, it is a Click Bomb. Maybe this sounds a little strange to those of you who are honeymooners with AdSense.

Tips and How to Overcome Adsense Click Bombs

You need to know that in the world of online Ads business classmates like Google AdSense, click bombs are common. If this happens to a new AdSense account then it is likely that the account is suspended by Google so that it can no longer serve its ads for a while or even forever.

Therefore, on this occasion I will share Tips and How to Overcome Adsense Click Bombs. So you can all anticipate the occurrence of Click bomb on the Adsense you use.

What is a Click Bomb?


Click bombs are very many clicks with the number of tens or even thousands of clicks from one user's computer IP or more and occur in a very short time so that it exceeds the clickthrough rate of the ads that have been calculated by Google AdSense. If this happens then AdSense will assume there have been invalid clicks (click fraud) and the account is susceptible to suspend or even permanently banned.

Tips and How to Overcome Adsense Click Bombs


Most likely the click bomb is done by parties who do not like the existence of our blog, it could be a competitor or a joke visitor. Here are some tips on how to prevent and overcome adsense click bombs.

Increase your blog's trust

Building trust is the key to making blogs safe from click bombs. People who make unnatural clicks must have certain reasons, show that there are bloggers who are friendly to visitors or other bloggers.

Avoid conflicts between fellow bloggers

Adsense click bomb actions can be caused by people who don't like you, you may have conflicts with the perpetrators. Well, this kind of character often happens, so you should be more careful.

Theft of other blog content (copas)

There are several typical bomb clicks that resulted from content diuri or in Copas. So you should try not to copy other blogger content.

Because of random spam

Spam activity is often the case, even though the goal is to get traffic but it is not uncommon to get disaster. Therefore you should avoid activities or spread links carelessly.

Don't show off

There are some bloggers who have the "show" nature, both show off traffic and show off income. This often happens in groups or blogger forums where there are arrogant showcases and immediately the blog is invaded.

Don't bomb other people's adsense

Like peppers "ready to plant must be ready to harvest", so try not to do a bomb click on someone else's blog. Just remember karma must apply.

What To Do When We Know Which Account Is In The Click Bomb?


When caught an account is being bombed clicks, the most appropriate action is to unlink the site from the AdSense account, so the Google will know your business to avoid the action so that the possibility of the account is not suspended by Google and other than that the number of clicks are not repeatedly will affect the account.

The characteristics of the account hit by a click bomb that is suddenly rising earnings with a large amount, RPM and CPC also rose, in addition to the acquisition of more clicks than the page view as shown in Figure 1 above.

Here are the steps to uninstall a site from an AdSense account when a bomb clicks:

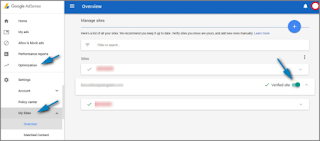
Go to the AdSense dashboard >> Settings >> My Sites >> Select a site that will be temporarily removed due to a problem with a click bomb. For more details, consider the following picture:

Tips and How to Overcome Adsense Click Bombs

To remove a site that was allegedly problematic with a bomb click then please follow the steps above in sequence, slide the toggle marked with number 3 towards the left. That way the account will remain safe because the site is no longer connected to AdSense.

The above step is done if you know the ads on the site page hit by bomb clicks, if you have many sites that are connected with AdSense pal as in the picture above, then it should be off only all sites connected to AdSense is temporarily until the situation is completely really conducive.

So if the site has high traffic, then it is likely to be saved from being banned so that the account continues to exist as usual despite a click bomb. If a click bomb occurs on a new account, then it's likely Google will immediately suspend the account. Seconds the occurrence of a click bomb that the balance will rise suddenly then it will come down again after a while until the normal number.

A good and friendly attitude towards anyone, especially in cyberspace is a strong protection from crime. Immediately uninstall the site that is connected with AdSense if you know the click bomb is happening, because then the ads on the site page will not have any effect even if clicked hundreds or even thousands of times.

Some tips that I can share about Tips and How to Overcome Adsense Click Bombs. Hopefully with this short article, it can be useful and useful for all of you. Thank you for visiting.
How to Add Google Custom Search Engine in Blog

How to Add Google Custom Search Engine in Blog

How to Add Google Custom Search Engine in Blog - Search box widget is one important part of a blog, because if there are visitors who find it difficult to find articles on their blogs can search easily through the Widget Search Box.

How to Add Google Custom Search Engine in Blog

Here I recommend using Google's special search on blogs, as the results will be more relevant and more complete than the regular search function. Moreover if you is a Google AdSense Publisher. Buddy can easily monetize blogs with this special search box. Later, AdSense ads will appear on the blog search results page.

Create a Google Custom Search Engine


1. Please visit the Google Custom Search site

2. Next please click "Create a custom search engine" to login to CSE

How to Add Google Custom Search Engine in Blog

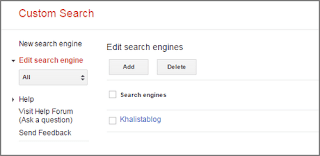
3. After logging into the CSE dashboard, click on "New Search Engine"

How to Add Google Custom Search Engine in Blog

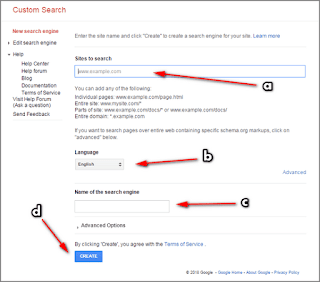
4. Then "content blog" as shown below

How to Add Google Custom Search Engine in Blog

a. Fill in your blog url
b. Change language settings according to the language used
c. Name of search engine
d. After defining the above settings, click the "CREATE" button

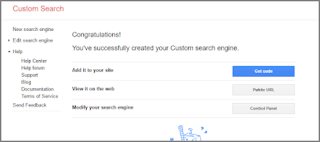
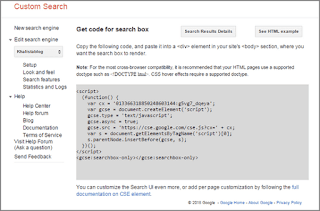
5. Then click the "Get code"

How to Add Google Custom Search Engine in Blog

6. Copy the script provided in the box

How to Add Google Custom Search Engine in Blog

Addendum: To create a Google Custom Search Widget to Valid HTML5, please replace the code below (obtained from step 6)

<script>
  (function() {
    var cx = '004846510630198233812:gmb5qovgjko';
    var gcse = document.createElement('script');
    gcse.type = 'text/javascript';
    gcse.async = true;
    gcse.src = 'https://cse.google.com/cse.js?cx=' + cx;
    var s = document.getElementsByTagName('script')[0];
    s.parentNode.insertBefore(gcse, s);
  })();
</script>
<gcse:searchresults-only></gcse:searchresults-only>

Replace the code marked with the code below

This applies to all layouts, like <gcse:search>, <gcse:searchbox>, <gcse:searchresults>, or <gcse:searchbox-only>

<div id="gcsengine"></div>
<script>
var gcseDiv = document.getElementById('gcsengine');
gcseDiv.innerHTML = '<gcse:searchresults-only></gcse:searchresults-only>'
</script>

So the result will look like this

<div id="gcsengine"></div>
<script>
var gcseDiv = document.getElementById('gcsengine');
gcseDiv.innerHTML = '<gcse:searchresults-only></gcse:searchresults-only>'
</script>
<script>
(function() {
var cx = '004846510630198233812:gmb5qovgjko';
var gcse = document.createElement('script');
gcse.type = 'text/javascript';
gcse.async = true;
gcse.src = (document.location.protocol == 'https:' ? 'https:' : 'http:') +
'//cse.google.com/cse.js?cx=' + cx;
var s = document.getElementsByTagName('script')[0];
s.parentNode.insertBefore(gcse, s);
})();
</script>

Add the Google Custom Search Engine Widget to your Blog


Login to Blogger >> Layout >> Create new widget (HTML / JavaScript) >> Add the code that was copied to new widget >> click Save and see result.

Monetize Google CSE with AdSense


1. Make sure you already have a blog that can be added Google AdSense

2. Please log in on Google CSE

3. Click the Name of the Search Engine that has been created earlier

4. Select Setup Menu

5. There is Basics Tab, Make money, Admin, and Indexing. Well, Please click the Make money tab.

How to Add Google Custom Search Engine in Blog

6. Please click the Active button on the Search Engine Monetization option.

Modify Ordinary Search Box by Adding Custom Search Engine Functions


1. If you want to install CSE function on search box that already exist in template, Please log in at Google CSE >> Click on Basics menu >> There is our unique Search engine ID given Google Search Engine >> Click the Search engine ID button >> Then copy the code inside notepad.

How to Add Google Custom Search Engine in Blog

2. Still in the Basics menu, click the Advanced button >> Replace Search engine encoding with West European Latin-1 (ISO-8859-1).

How to Add Google Custom Search Engine in Blog

3. Next login to Blogger >> Create post for static page >> Copy code obtained from CSE, code example:

<div id="gcsengine"></div>
<script>
var gcseDiv = document.getElementById('gcsengine');
gcseDiv.innerHTML = '<gcse:searchresults-only></gcse:searchresults-only>'
</script>
<script>
(function() {
var cx = '004846510630198233812:gmb5qovgjko';
var gcse = document.createElement('script');
gcse.type = 'text/javascript';
gcse.async = true;
gcse.src = (document.location.protocol == 'https:' ? 'https:' : 'http:') +
'//cse.google.com/cse.js?cx=' + cx;
var s = document.getElementsByTagName('script')[0];
s.parentNode.insertBefore(gcse, s);
})();
</script>

Copy the code as above into the static HTML post tab >> Then Publish post. Suppose you create a static post with the title "Search CSE", then the url in the can is "your_blog.com/p/search-cse.html".

4. Next open Template >> Edit HTML >> Search HTML from Search Box on template >> Here is sample HTML Search Box on blog template that I use.

<form action='/search' class='searchform' method='get'>
<table>
      <tbody>
        <tr>
          <td class='search-box'>
            <input id='search-box' name='q' onblur='if(this.value==&apos;&apos;)this.value=this.defaultValue;' onfocus='if(this.value==this.defaultValue)this.value=&apos;&apos;;' type='text' value='Search...'/>
          </td>
          <td class='search-button'>
            <input id='search-button' type='submit' value=''/>
          </td>
        </tr>
      </tbody>
    </table>
</form>

5. Then add this code in your search box

<input type='hidden' name='cx' value='partner-pub-004846510630198233812:gmb5qovgjko' />
<input type='hidden' name='cof' value='FORID:10' />
<input type='hidden' name='ie' value='ISO-8859-1' />

The marked code is the code of the Search engine ID that was copied in notepad, replace the code marked with the code of Search engine ID of your blog.

6. Then look at the code below

<form action='/search' class='searchform' method='get'>

Please replace the code above with the code below

<form action='your_blog.com/p/search-cse.html'  class='searchform'>

7. Then the result will be like this

<form action='your_blog.com/p/search-cse.html' class='searchform'>
<input name='cx' type='hidden' value='partner-pub-004846510630198233812:gmb5qovgjko'/>
<input name='cof' type='hidden' value='FORID:10'/>
<input name='ie' type='hidden' value='ISO-8859-1'/>
<table>
      <tbody>
        <tr>
          <td class='search-box'>
            <input id='search-box' name='q' onblur='if(this.value==&apos;&apos;)this.value=this.defaultValue;' onfocus='if(this.value==this.defaultValue)this.value=&apos;&apos;;' type='text' value='Search...'/>
          </td>
          <td class='search-button'>
            <input id='search-button' type='submit' value=''/>
          </td>
        </tr>
      </tbody>
    </table>
</form>

8. Save the template and see the results.

Such is the tutorial tips that I can share about How to Add Google Custom Search Engine in Blog. Hopefully with a short enough article this can be useful and good luck.
Source: https://www.arlinadzgn.com/2016/04/memasang.google.custom.search.engine.di.blog.html
What is Difference Between Hosted and Non Hosted Adsense Account

What is Difference Between Hosted and Non Hosted Adsense Account

Difference Between Hosted and Non Hosted Adsense Account - Google AdSense is one of the Google products in the form of an advertising platform for publishers to display ads on their products or content, Google Adsense or commonly called adsense has two types of account that is Hosted Account and Non Hosted Account.

What is Difference Between Hosted and Non Hosted Adsense Account

The difference between hosted and non hosted adsense accounts is raised because Google has many products that can work with Google AdSense and to make it easier to apply for cooperation.

Difference Between Hosted and Non Hosted Adsense Account


Hosted Account

Hosted accounts are accounts associated with other Google products like Blogspot and YouTube. Users who want to connect their Blogspot account or their YouTube account to AdSense will be more easily accepted if using Hosted Account. This also applies to other Google products like Play Store and more.

However, this Hosted Account Account is not easy to request displaying ads on other products such as websites or blog sites. But it will be very easy to approve the submission if it is filed for a Google product such as YouTube.

Non Hosted Account

Is a pure Google AdSense account created without any other Google product intermediaries. This account was created purely from scratch on the Google AdSense website page for the website.

When signing up for Google AdSense purely like this, you sign up for Google AdSense to show ads on websites or in products other than Google products. The advantage of having an AdSense Non Hosted account is not easy on the block, because Hosted Account has additional policies related to the product.

Of course it will be wider your reach because it can pair ads anywhere with Non Hosted account this. There are even some people who open cooperation such as displaying ads on your site without the need to have Non Hosted Google AdSense account. Cooperation is usually the income will be divided by 20 or what percent percent according to the policy of the account owner.

Which account should I have?


It depends on your activities and needs. If you are active in a Google product like YouTube or Blogspot then simply create a Hosted Account just because approval will be easier. But if you are moving on a website or other products other than Google products then it should create a Non Hosted Account, this submission is certainly not easy.

Can I Post Other Ads In Google Products Using Hosted Accounts?


Yes, of course you can. On the menu on the Google AdSense page there is no such thing as Other Products that use to propose advertising outside Google products such as personal web sites. This is not easy to agree on but there is nothing wrong if you want to try.

So the conclusion of the above explanation, that Hosted Account or Non Hosted Account has the same policy base that is Google AdSense policy and policy in each Country, but for Hosted account have another addition that is policy of Google product concerned.

A little secret you may want to know, writers or bloggers are very very eager to have a Google Non Hosted account and it is not easy to get it even to this day there are still waiting and trying to apply several times for Non Hosted account.

From that conclusion, I think if your email is connected to a Hosted account and have a website or product other than Google products I suggest trying to create a Non Hosted account. Because it gets harder (instead of making non hosted from scratch) if the Hosted account wants to apply for products other than Google.

A few explanations from me about Difference Between Hosted and Non Hosted Adsense Account. Hopefully with this article I have written, it can be useful for us all. Thanks for visiting.