Showing posts with label Wordpress. Show all posts
Getting Started Before Creating a Blog on Self-hosted WordPress

Getting Started Before Creating a Blog on Self-hosted WordPress

Getting Started Before Creating a Blog on Self-hosted WordPress - Creating a blog on self-hosted wordpress is not an easy thing to do. I know that you just want to start creating a blog or website using self-hosted wordpress. Although it's not easy, you can definitely make it!

Getting Started Before Creating a Blog on Self-hosted WordPress

In this article I shared this time will explain what needs to be prepared before making a blog on self-hosted wordpress. Let's start by finding out what needs to be prepared to create a blog on wordpress.

What is WordPress?


WordPress is an open source application that is used as a blog engine, built using the programming language PHP and MySQL as its database.

WordPress is one of the favorite CMS (Content Management System) platforms in the world to date. With wordpress you can create various types of websites such as personal blogs, company profiles, to online stores. That is the meaning of wordpress in brief.

There are two types of wordpress you need to know, namely:
  • WordPress.com (Hosted)
  • WordPress.org (Self-hosted)

What is the difference between WordPress (Hosted) and WordPress (Self-hosted)?


Although both wordpress turns out both of them have conflicting differences. This is the difference between WordPress (Hosted) and WordPress (Self-hosted):

WordPress (Hosted)

WordPress (Hosted) can be called free wordpress or free.
  • Free, without paying a fee.
  • Limited features, unable to access panel controls.
  • Simple theme and website appearance.
  • Using sub domains.

WordPress (Self-hosted)

WordPress (Self-hosted) we can call premium wordpress aka paid.
  • Paid, for hosting and domain fees.
  • Full features, have access control panel.
  • Themes and website views are more interesting.
  • Use the main domain.

What Should Be Prepared Before Creating a Blog on Self-hosted WordPress?


There are several things you need to prepare before creating a blog on self-hosted wordpress, namely:

1. Fees

In making a blog or website using self-hosted wordpress, costs are the main factor that you need to prepare. Enough with around $ 16USD per year you can rent a hosting package.

In addition to hosting, you also need to pay a fee to buy a domain that costs around $ 8.05 USD per year. So, the main cost that you need to prepare to create a website is approximately $ 24.14 USD per year.

2. Determine the Topic

If costs are not a problem for you, then it is to determine the topic for the blog or website that you want to create. What topics or themes will be discussed on your site?

Lots of topics that you can choose, for example:
  • Technology
  • Health
  • Sports
  • Automotive
  • News
  • Personal blog
  • Online store
  • etc

3. Finding a Unique Domain Name

After determining what topics you will discuss on your site, now is the time you are looking for a unique domain name that will be your site address.

There are some tips from me that you need to pay attention to when choosing a domain name, namely:
  • Have a relationship with the topic you choose.
  • It must be easy to remember, write and say.
  • Avoid using characters and numbers.
  • Prioritize .com
  • Don't use someone else's brand.
  • Don't use domain names that are similar to other websites.

4. Choosing a Theme / Template for Blog

After getting a domain name that is suitable for your blog or website, now is the time for you to find a theme or template that matches your site. Why do you need to specify a theme before making a blog on wordpress self-hosted?

So don't get when your blog discusses health topics but you use themes related to automotive, this is not funny so it has something to do.

It would be better if you can use a theme that matches the topic on your website. Choose a theme that you really like and according to the topic you choose. Use themes once and forever, meaning don't change themes.

Why?

From my personal experience. The first theme I use uses a builder to design the appearance, when I change a theme or template it looks messy because the builder used on each theme is different. To avoid this happening to you, then choose a good theme and don't change themes.

5. Start Creating a Self-hosted WordPress Blog

After finding the right theme for your site, now is the time for you to start creating a blog using self-hosted wordpress. Like you have to install wordpress, install themes, install plugins, change default wordpress settings, make posts, and customize your blog.

Those are some initial preparations before creating a self-hosted blog on wordpress. Hopefully with these brief tips, it can be useful for all of you and good luck.
6 Ways to Get Money from the Internet Quickly and Easily

6 Ways to Get Money from the Internet Quickly and Easily

6 Ways to Get Money from the Internet Quickly and Easily - In the age of technology changed many things today, especially in the field of internet. The internet not only provides convenience in finding information and conducting transactions but also provides many opportunities for anyone who wants to make money through the internet. With the internet, everyone has the same opportunity to become rich depending on how we take advantage of this opportunity.

6 Ways to Get Money from the Internet Quickly and Easily

Making money through the internet has long been done by many people, but this opportunity is still wide open and can be said to be very promising. Not only as a place to look for side income, but you can also make the fields as a field to find a steady income with fantastic results that can even beat the salaries of most civil servants. In this article I will explain some income sources that you can try to make money through the internet.

How To Get Money From The Internet For Beginners


For those of you who are beginners and do not know how to get money from the internet, you do not need to worry because everything you can learn as long as there is a spirit of wanting to succeed through the internet. For more details, here's how to get money from the internet for beginners:

1. BLOGGING

Blogging can be said to be a way of making money from the internet which has been very long and can even be said to be old school. But you need to know that with blogging you can make a lot of profits and can be said to be the easiest way to get money from the internet.

You only need to write quality content that is needed by many people on a regular basis so over time you will be able to make money from advertisements, reviews for products related to your blog niche and much more.

Creating a successful blog you cannot achieve instantly. You need to learn a lot both in terms of writing and SEO. In blogging hard work and patience are needed, but blogging itself has the advantage of not having any risk so you don't need to be afraid to try to become a blogger. And once again that bloggers can be a great way to make money from the internet easily.

2. YOUTUBE

Since the internet in Indonesia already supports 4G networks, then YouTube was very popular at the time and everyone could access YouTube easily and quickly. YouTube in Indonesia is growing very rapidly and this is used as a tool to make money on the internet very easily. Evidenced by the many emerging new YouTubers every day.

You only have to create a YouTube channel and then create interesting content and upload it so your video will be seen by many people and get subscribe. You only have to wait for the results of revenue from advertising even if your channel is very popular so it is possible that you will get advertisements from outside parties such as endorse products.

However, getting money on the internet via YouTube also requires a consistent upload of videos on YouTube on a regular and interesting basis. In addition to uploading videos, also make sure to describe the content specifically in the description of your video so that it makes it easier for search engines to find your video.

Don't forget to link your other social media links on YouTube. You can also share your YouTube videos to various social media or even on your personal blog to get a lot of viewers.

3. AFFILIATION

Affiliate is a good and easy way to get money from the internet. Affiliate is a way to earn money by offering or promoting products or services owned by other people and when there are visitors who purchase these products through your affiliate link, you will get a commission in accordance with the agreement set.

All you need to do to join an affiliate program is to find out what products or services you want to offer and after that create a website or blog and write a review about the product or service you want to offer. You can also promote these products via email and social media. Lots of sites that open vacancies for affiliate programs like the most popular are Amazon and many more online stores in Indonesia that offer affiliate programs.

Like the thing on the center blog, click here, I also follow several hosting service affiliate programs and also get paid from quite a lot of commissions. You can start now to try to create a blog and join an affiliate program to get money from the internet.

4. FOLLOW THE PAID SURVEY

On the internet there is also a program called paid surveys, where you can fill out surveys that are given to you and later you will get points where each survey you complete will get different points. After the points are collected and reach the target set to be disbursed, then you can get money from the internet through a survey program. In addition to money, the survey program can also offer offers to exchange your points with shopping or credit vouchers.

Only by conducting a survey why can you make money because sometimes there is a company that really needs an opinion about a product they produce. Therefore, there are a number of companies that provide paid surveys on the websites they have, this survey is useful for the development of the products they make.

5. DROPSHIPPING

Dropshipping can be an activity that can help you get money from the internet. Dropshipping is helping sell other people's products and you can determine how much profit you want to get.

To become a dropshipper, you only need to create your own online store or join in some of the existing marketplaces and you can install items that you want to sell in your store. After there are buyers who order, you only need to contact the seller to send the goods to the customer who bought it. So, to get money from the internet, you don't need to have your own merchandise, but only to promote the item.

6. FREELANCER

If you have expertise in certain fields such as writing, translating, coding, design or other skills. You can try to join the site of the freelancers and offer your expertise. That way you can get money from the internet through the expertise you have. You only need to join freelancer sites and make a profile as interesting as possible, if you get a job try to get it done as well as possible so that the client feels satisfied with the results of your work and gives a high comment or rating that can attract other potential clients.

And that's a number of ways you can make money from the internet easily. The internet can be a place to find money without limits, so please start today to apply one of the above methods that best suits you. Keep trying and good luck.
How to Use All In One SEO Pack WordPress [New]

How to Use All In One SEO Pack WordPress [New]

How to Use All In One SEO Pack WordPress - For you WordPress users will be spoiled by the many free SEO plugins that you can choose to use on the SEO optimization of your WordPress website. However, of the many SEO plugins contained in the WordPress library, you will find two SEO plugins that are the most popular and most widely used by WordPress users around the world, these two SEO plugins are All in One SEO and SEO by Yoast. Indeed the two plugins have a premium version, but for me the free version of the two is more than enough to make your site more SEO friendly.

How to Use All In One SEO Pack WordPress

As in the title of this article, I will specifically discuss in full how to install and setup the All In One SEO plugin. For beginner bloggers, configuring the All in One SEO plugin can be very complicated, and without configuring the plugin you cannot get more benefits from this plugin.

All in One SEO is a plugin that has simpler settings than its competitors plugin SEO by Yoast. For those of you who don't like complexity, this plugin might be suitable for you. And this plugin has a single settings page so you will easily follow this tutorial.

WordPress has been created as a search engine friendly platform and has been optimized for SEO by default, but aside from the default settings, there are many settings we need to do to make it more solid for search engines. Here is a complete configuration guide for the All in One WordPress SEO Plugin, which will help your blog more SEO friendly.

How To Use and Setting All In One SEO Pack WordPress


To use this All in One SEO Pack plugin you must install and activate the plugin. After your plugin activates, you will see a new menu with the name "All in One SEO" on the sidebar menu of your WordPress admin and click "General Settings".

How to Use All In One SEO Pack WordPress

In General Settings you can see the settings as shown above, where I check "Canonical URL", "Use Original Title" and "Use Schema.org Markup".

How to Use All In One SEO Pack WordPress

In this "Homepage Settings" setting you need to fill in some details such as Home Title, and Home Descriptions. Here are some explanations of what you need to fill out.

Home Title: Fill in the name of your Blog along with the Keyword (keyword) or tag line, in this column you are recommended to fill a maximum of 60 characters for better results.

Home Descriptions: In this column you fill in the description of your blog, you are advised to fill in no more than 160 packages. Make your description meaningful, informative and there are rich keywords.

Home Keywords: In this setting the above screenshot is not visible because I did not activate it, because Search engines do not rely on Meta Keywords anymore, so you can ignore this field, but if you prefer to use this Keyword you can fill it with keywords that you aim.

How to Use All In One SEO Pack WordPress

You can follow the "Title Settings" setting as shown in the picture. Or you can delete the %blog_title% format in the Post Title Format section.

And below are the settings that you must adjust for the "Custom Post Type Settings":

How to Use All In One SEO Pack WordPress

and the settings in "Display Settings", you can adjust as shown above.

How to Use All In One SEO Pack WordPress

Webmaster Verifications: this section is useful for verifying your WordPress blog with Google Webmaster Tools, Bing Webmaster Tools and Pinterest. All you need to do is, register your site with all three sites, and take the verification key, and paste it in that section. You don't need to fill in everything if you only register your site on the Google and Bing search engines.

How to Use All In One SEO Pack WordPress

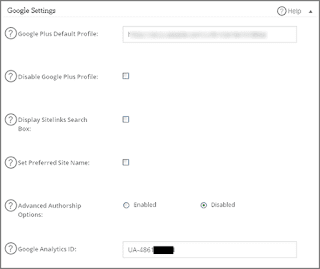
Google Settings: The All in One SEO plugin supports Google Authorship. This will work well when you run a WordPress blog with a single author. Just add your Google plus profile URL, and on the Google profile plus you add a link to your Blog too. In this setting you can also enter a Google Analytics ID that is useful to enable Google Analytics tracking for your blog.

How to Use All In One SEO Pack WordPress

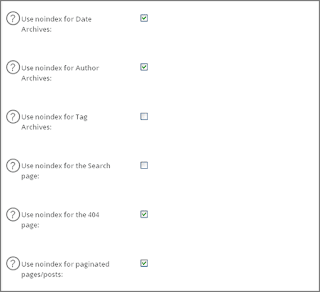
In the "noindex settings" setting, this is where one of the most important settings is, because you don't want your archive page to be indexed on Google. You need to know that the archive page is used for user experience and for navigating your site. When indexed in search engines, the archive page works as a low quality page. So, you should select noindex in all of these archive pages in this setting.

At the bottom there is the "Advance Settings" setting, uncheck the "Auto Description Generated" option, so that you can write Meta Descriptions according to your own desires that can produce a better CTR.

How to Use All In One SEO Pack WordPress

The last setting is "Keyword Settings" (Keyword), and as I explained above that search engines do not depend on Meta Keyword now, in this setting they prefer to disable (disabled).

And after you have done the settings, then click "Update Options", and you are ready to use this All in One SEO Pack plugin.

How To Set Up All In SEO On Post and Page


There are two options in the Post and Page settings if you disable Keyword settings in the configuration, but if you choose enabled in Keyword Settings there will be three choices. In this section, information will be displayed on search results in search engines:

How to Use All In One SEO Pack WordPress

Meta Title

This you can fill in with the title of your article, make sure the keywords (keywords) that you are aiming for are also included in this section. When you write a post, there is a difference between how you want the search engine to see your post and how you want your reader to see the post title. This option gives you the freedom to make your post title search friendly to search engines and to your visitors as well.

Meta Descriptions

Meta description is one of the most important parts of SEO optimization. Meta description is the quote information that will be displayed in the search results of your page. You can enter a rich description of the keyword, and if you don't fill in this section, this plugin will automatically take 160 words at the beginning of the paragraph as a description. I suggest that you write less than 160 characters for the meta description, which must also include your keyword target.

Keywords

You can leave this section blank or deactivate this setting, because like I said earlier that Google has not used Meta Keywords to find your article.

Feature Manager


In All in One SEO, there is also a Feature Manager menu which contains useful Add Ons such as: XML Sitemaps, Social Meta, Robots.txt, File Editor, Importer and Exporter, Bad Bot Blocker, Performance and the last is Video Sitemaps (Only for the Pro version).

How to Use All In One SEO Pack WordPress

The above features are the same as additional features brought by SEO by Yoast, by activating these features you will get excess benefits such as XML sitemaps, by activating these Add Ons you no longer need to install the Google XML Sitemaps plugin.

File Editor functions to edit htaccess files without the need to enter your cpanel hosting and many others. To use it you only need to press the "Activate" button and to deactivate you only need to press the button that changes to "Deactive".

That's the Tutorial About How to Use All In One SEO Pack WordPress that you can follow so that your WordPress site SEO optimization is maximized. Please try and hopefully be useful.
Tips to Improve SEO WordPress Website

Tips to Improve SEO WordPress Website

Tips to Improve SEO WordPress Website - In this post I will provide Tricks Tips to improve SEO on websites that are built with WordPress CMS (Content Management System). Follow these simple SEO tips and tricks below so that your WordPress site is maximized in search results. But before you read WordPress SEO tips, you should know in advance the importance of optimizing SEO on the website below.

Why Should SEO be Optimized On our Website?


SEO is very important to increase visitors to websites and blogs, because with optimal SEO and of course maximum, it will be very influential with the business we run through the online world, People will never know our business, our products if our website is never visited. To introduce our blog or website other than blog walking and promotion on social media the main way to enter our blog or website is through Search engines, so we have to optimize our website so that it can be posted on search engines so people will automatically visit our blog or website.

Tips to Improve SEO WordPress Website

By optimizing SEO, you will get traffic traffic from search engines for free and this will certainly be a way that will generate visitors in the long run in contrast to when you do an advertising marketing campaign where you will experience a decrease in visitors when the ad program that you run ends . And let's take a look at the simple tips and tricks below to improve the SEO of your WordPress blog or website.

How do I Optimize SEO On the WordPress Website?


1. Remember Content is King, so make content that is interesting, clear and easy to understand, people coming to our website are to find answers to the questions in search engines, so if our content is interesting and as expected by the visitors, the visitors will feel happy and our website can be a reference for visitors. Make detailed content and articles that meet SEO standards such as writing content that is at least 600 words minimum. and don't forget to always update content that is interesting and provides solutions for visitors.

2. Optimize Content with Keyword, it's useless if we make good content but not readable by search engines, therefore optimize your content so that it is easily indexed in search engines and gets ranked on the first page. Enter keywords in your article and don't forget that if you use h2 or h3 tags always include keywords in them.

3. Website design, make your website interesting and also responsive, so that visitors are not bored and love to read your articles, layout your website with interesting, easy-to-read fonts. to be responsive is very important, because today many visitors are browsing using smartphones, so make your website automatically match the device of each visitor so that visitors feel comfortable accessing your website. if you need a WordPress template that is responsive and SEO friendly, don't be confused because at the center click there are already lots of responsive website templates and of course with a very good and free design, please see the Responsive Best Design Free WordPress Template Collection.

4. Optimize SEO on images, if on your website using images to beautify content, then don't forget to optimize SEO on the image, to optimize SEO on images using WordPress SEO Friendly Image plugins. Images are also one source of traffic coming in addition to content. Because also many people use image search via search engines. If you don't want to use the plugin, you can always fill the manual in the "alt" and "description" tags every time you upload and use images to be included in your article.

5. Create an XML Sitemaps on your website and submit your website sitemap.xml to Google webmastertool and Bing webmastertool, so that your website url will be listed on Google and Bing search engines. This way the search engine will be easier to crawl your site and will get a faster index.

6. Create a permalink on your WordPress website that is SEO Friendly. Beautiful permalinks or URLs prove effective in competition in search results rankings, and in this section don't forget to always enter keywords in the URL because the URL is always read by search engines in finding articles.

7. Make your website domain name from non-www to www or vice versa, choose one. because to avoid duplicate content by entering the script below to .htaccess. Or you can also buy a domain name that contains the keywords that you are aiming for.

RewriteEngine On
RewriteCond %{HTTP_HOST} ^ [NC]
RewriteRule ^(.*)$/$1 [L,R=301]

8. Optimize content with Title H1 and for subtitles H2-H3, because the google search engine is very happy with content like this. This way makes Google better understand structured and clearer content. Content with clear tags will be prioritized by Google to be displayed on the first page.

9. Use Social Networking Share on your website and content, so that your website can easily be shared on various social media to promote and share articles that you create.

10. Use the All in one SEO or WordPress SEO Yoast Plugin on your WordPress, this plugin has proven effective in improving SEO on WordPress.

Note: Remember the speed of the website affects Google's SEO and Pagerank.

Above are some simple SEO tips and tricks that you can apply to your WordPress site. Hopefully this article is useful and helps your website or blog get a better ranking in search results. Good luck.
How to Redirect Automatic Error 404 Page To Homepage With JavaScript

How to Redirect Automatic Error 404 Page To Homepage With JavaScript

How to Redirect Automatic Error 404 Page To Homepage With JavaScript - It could be that a blog has an error page 404 or a page not found. Usually the page has been deleted or by other causes such as writing errors in posting URLs, and others.

Usually on a blog or web to create a page or landing page specifically for error 404 pages by giving a statement that the destination page has been deleted or no longer exists. The rest is given a button to the homepage or provided a search box to search for the desired post again.

How to Redirect Automatic Error 404 Page To Homepage With JavaScript

Now this time I will give a trick to automatically redirect or redirect the error 404 page to the compilation so that visitors do not need to click the button to the homepage. Actually, posts like this have a lot on Google, but there are some that are still difficult to implement because the script does not work in some templates, especially templates that use conditional tags for error 404 pages. So if you want to try it, you can immediately follow the following steps this.

How to Redirect Automatic Error 404 Page To Homepage With JavaScript


To automatically redirect or redirect the 404 error page to the compilation, actually it's very easy to simply copy the code below, then put the code before the code </body> or &lt;!--</body>--&gt; &lt;/body&gt;

1. For nonAMP blogs

<b:if cond='data:blog.pageType in {&quot;error_page&quot;}'>
<script>
setTimeout(function () {window.location.replace("<data:blog.homepageUrl/>");
    }, 8000); //will call the function after 8 seconds.

</script>
</b:if>

The above code will automatically redirect the error 404 page to the homepage after 8 seconds, so that visitors can still read the message on the error 404 page, you can set / replace the 8000 number to set the waiting time. 1 second = 1000.

If you want to directly redirect, use the following code.

<b:if cond='data:blog.pageType in {&quot;error_page&quot;}'>
<script>
setTimeout(function () {window.location.replace("<data:blog.homepageUrl/>");
    });
</script></b:if>

Or

<b:if cond='data:blog.pageType in {&quot;error_page&quot;}'>
<script>
window.location.replace("<data:blog.homepageUrl/>");
</script></b:if>

2. For AMP Blogs

As for blogs that use mobile URL mobile?m=1 as AMP, use the following code that will only apply to desktop URL.

<b:if cond='data:blog.pageType in {&quot;error_page&quot;} and data:blog.isMobileRequest == &quot;false&quot;'>
<script>
setTimeout(function () {window.location.replace("<data:blog.homepageUrl/>");
    }, 8000); //will call the function after 8 seconds.
</script></b:if>

Or

<b:if cond='data:blog.pageType in {&quot;error_page&quot;} and data:blog.isMobileRequest == &quot;false&quot;'>
<script>
setTimeout(function () {window.location.replace("<data:blog.homepageUrl/>");
    });
</script></b:if>

3. WordPreess

This can also be used in WordPress, please save this code in the 404.php section at the bottom.

<script>
setTimeout(function () {window.location.replace("<?php echo home_url('/'); ?>");
    }, 8000); //will call the function after 8 seconds.
</script>

or

<script>
setTimeout(function () {window.location.replace("<?php echo home_url('/'); ?>");
    });
</script>

Thus tips that I can share about tips on How to Redirect Automatic Error 404 Page To Homepage With JavaScript. Hopefully with these brief tips, it can be useful and useful for all of you. Good luck.
How to Rewrite Articles that Are Good To Be Unique and Competitive

How to Rewrite Articles that Are Good To Be Unique and Competitive

How to Rewrite Articles that Are Good To Be Unique and Competitive - The fact that cannot be denied is that most bloggers use the article rewrite technique. This is true, especially for those who have tutorial sites or news sites. How to rewrite articles or writings does look easy, but if it is not balanced with a good rewrite skill then it is the same as copy and paste.

How to Rewrite Articles that Are Good To Be Unique and Competitive

Rewrite article is rewriting articles with modifications and actions that are legalized, different from copy paste. Rewrite posts are not easy to compete in search engines !,. therefore it is necessary to use the correct method or rewrite method so that the articles are unique and able to compete in the search Serpent.

How to Rewrite Articles that Are Good To Be Unique and Competitive


For those of you who manage news websites or tutorials, they sometimes find it difficult to write rewrite. Well some of the tips below will help you:

Change language style


Language style reflects the character and character of the author, so the way to make a good rewrite article is to change the style of the language in the writing. In this case use language that is easy to understand and in accordance with your style. Apart from that, the most important thing is not to make the posting become unreadable.

Use a lot of resources


A text will be more relevant if it comes from various sources. Now find writing that matches the title you want to make, more resources are better. Don't forget to read and understand the core explanation of the source article that will be written. Logically you will not be able to change the language of the article if you do not understand the meaning of the previous article.

Add a little spice to your article


The spice intended here is additional information that you should add so that your article is different from the previous articles.

As an example:
  • Article 1: discuss the meaning of blogs, types of blogs, the purpose of blogs, how to create,
  • Article 2: discussing the meaning of blogs, types of blogs, purpose of blogs, history of blogs, how to create,

So you have to make your article better than the previous article, try to be more complete and deeper.

Keyword research


The important part for posting can compete in search results is to do keyword research. Find the most searched keywords with low competition. That way the chances of posting posts to the first page of Google will be much greater.

Here are some important keyword research points:
  • It's better to use a long tail keyword
  • Look for keywords that have low competition
  • Take advantage of Google trends to see popular topics today

Make SEO Friendly articles


Furthermore, so that the article is able to compete, apply good SEO methods to your article, both SEO on Page and Off Page. Make the rewrite article as natural as possible so that it is easy to read by visitors.

Notice:
  • Keyword placement,
  • Keyword density
  • Alt tag
  • Perform image optimization
  • Build post links (backlinks)

Modification of article titles is more unique


When you have done keyword research, you will get several long tail keywords that are suitable as titles. Making an attractive title will make a good contribution.

Example: "Keyword research: create a blog"

Results:
  • How to make a free blog
  • How to create a blog with blogspot
  • How to make money from a blog
For example, you can modify the article title to "How to create a blog on blogspot to make money"

You need to know that rewriter is better than copy paste. So it's better to write posts than copy paste. Now that's some important tips on how to create unique and quality rewrite articles. Hopefully this post is useful for all of us. Good luck.
How to Add and Use Google Tag Manager in WordPress

How to Add and Use Google Tag Manager in WordPress

How to Add and Use Google Tag Manager in WordPress - Google issued a new tool called Google Tag Manager, this tool has many benefits for various websites and also web sites built with WordPress. This Google Tag Manager like the name suggests will help you add and manage all the various scripts you use on your site in one place.

How to Add and Use Google Tag Manager in WordPress

For example, you can add various codes from:
  • Google Analytics
  • Event Tracking
  • Google Optimize
You can add all the code and can manage everything through Google Tag Manager.

In this article, I'll show you step by step how to install Google Tag Manager on your WordPress site and how to add code on your WordPress site. And then, I'll give you a quick guide on how to publish your first tag and make sure it works.

What is Google Tag Manager?


Often website owners need to add some code to track conversions, traffic, and collect other analytical data manually one by one. With Google Tag Manager, you can easily add and manage all these scripts from a single dashboard. There is a default tag template for Google Analytics, AdWords, DoubleClick, etc. Google Tag Manager also works with some third-party analytics and tracking platforms beyond Google products.

In addition, you can use custom HTML to add your own tracking or other code you want to add. It saves you time to add and remove tags from your code and manage them from the easy dashboard. Not to mention, all of these scripts are loaded in one script and one place.

Google Tag Manager will be much easier and convenient for you. And once you understand more about Google Tag Manager, you can even start using this powerful tool to collect more actionable data to inform your marketing efforts.

Sign up for a Google Tag Manager account


If you have not already done so, the first thing you need to do is sign up for a Google Tag Manager account that you can do for free. You can do this by going to here >> Google Tag Manager.

After you register, you must be in the 'Add New Account' interface. Please provide your company name:

How to Add and Use Google Tag Manager in WordPress

Then, in the 'Setup Container' section, enter your website name in the 'Container Name' field and select 'Web'.

How to Add and Use Google Tag Manager in WordPress

After you accept the Google Terms of Service, Google should direct you to the Google Tag Manager page and show two code snippets. Keep this window open because you need to add both snippets of this code to your WordPress site in the next section.

How to Add and Use Google Tag Manager in WordPress

Add a Google Tag Manager code snippet to your site


This is a rather complicated part. Previously, you only need to add a single snippet of code to the sharing of the WordPress theme you're using, but now Google Tag Manager wants you to add two snippets:
  • The first goes to the <head> of your theme
  • The second put the code right after the opening tag <body>

In addition to editing your child theme or child themes directly, WordPress does not give you an easy way to enter the code after the tag, and each theme works a little differently so I can not give you a tutorial that applies to all themes.
  • If you already feel comfortable editing your child theme or child theme files directly, you can do it.
  • If you feel uncomfortable working directly with your theme file, I'll show you two different methods you can use - beginner-friendly plugins and simplified code methods.

Use Head, Footer and Post Injector Plugins


If you're fine with dedicating plugins to Google Tag Manager, the easiest way to add them is to use free Head, Footer, and Post Injections plugins.

To get started, install and enable this free plugin. Then, go to Settings >> Header and Footer in your WordPress dashboard to access the plugin interface.

Now:
  • Paste the first Google Tag Manager code snippet into the ON EVERY PAGE box under PAGE SECTION INJECTION
  • Paste the second Google Tag Manager code snippet into the DESKTOP * box in the TAG section (do not worry - the code snippet will still be loaded on the mobile) Injections Head, Footer and Post only allow for separate code snippets if you check the mobile box)

It should look like this:

How to Add and Use Google Tag Manager in WordPress

Be sure to save your changes and you're done.

Use a Functions.Php Code Snippet


With the method of adding code on functions.php is technically not 100% optimal. This works well for most sites and not for a small portion of the site, but I'll explain what I mean after I show you what to do.

To use it all you need to do is add this snippet of code to your child childfunctions.php child theme:

add_action('wp_head', 'gtm_head_code');
Function gtm_head_code(){
?>
First Code of GTM Interface
<?php } add_action('wp_footer', 'gtm_body_code'); Function gtm_body_code(){ ?>
Second Code of GTM Interface
<?php
}

Be sure to replace the placeholder with the actual code snippet.

So why is this method not 100% optimal?

Since this method places a second snippet of code in the footer, not after the opening tag, your tag may not be activated if the visitor does not fully load your page. That's why Google recommends that you add as high code as possible on your site. But for most sites? This method is really good.

Testing to Ensure Your Code Snippet Works


To make sure you install Google Tag Manager correctly:
  • Open the free GA Checker tool
  • Enter your website URL
  • Click 'Check Your Site'

Go to the 'Tag Manager' tab menu in the results and look for the green checkbox in the 'Tag Manager' column:

How to Add and Use Google Tag Manager in WordPress

If you see it - congratulations! You installed the Google Tag Manager script correctly on your WordPress site. Now, let's learn how to use Google Tag Manager to create your first tag.

Creating Your First Tag


After adding the code snippet to your site, you can go back to the Google Tag Manager page and create your first tag.

"Tags" is essentially a special script that you want to paste into your site with Google Tag Manager.

To get started, click on 'New Tag' in your Google Tag Manager dashboard:

How to Add and Use Google Tag Manager in WordPress

By clicking 'Tag Configurations', you can choose what type of tags to create. Google includes all types of pre-installed options for things like Google Analytics, Google Optimize, and many other third-party services.

But you can also use the 'Custom HTML' or 'Custom Image' tags to include code on the client side:

How to Add and Use Google Tag Manager in WordPress

After you select 'Tag Type', you need to configure it to follow the settings. Then, you can click on the 'Triggering' section to choose when to "activate" your tags. The default is All Pages, but you can also get more targets to your liking by clicking on the + icon:

How to Add and Use Google Tag Manager in WordPress

Once you've done everything, click 'Save'.

Publish your Container


Now, all you need to do to make your tag alive is to publish your Container. To do so, click the 'SUBMIT' button in the Google Tag Manager interface:

How to Add and Use Google Tag Manager in WordPress

Then, enter Version Name and Descriptions Name. I suggest you make this as detailed as possible to help with later version control. That is, explain which tags you have added and what they do. Then, click PUBLISH:

How to Add and Use Google Tag Manager in WordPress

And you just published your first tag.

How to Test Individual Tags work


If you want to make sure every tag in your 'Container' is enabled, Google offers a free browser extension for Chrome called Tag Assistant.

Resources To Help You Become a Google Tag Manager Pro


Currently, you have successfully added Google Tag Manager to WordPress. But Google Tag Manager has enough in-depth functionality and explains the large number of interface options that go beyond the scope of this article. So now that you've installed Google Tag Manager, you can learn more about the interface in Google Tag Manager.

And that's the guide on how to add and use Google Tag Manager in WordPress. Hopefully this article useful for you and good luck.