Showing posts with label Adsense. Show all posts
How to Speed up Loading a Blog with Lazy Load for AdSense

How to Speed up Loading a Blog with Lazy Load for AdSense

How to Speed up Loading a Blog with Lazy Load for AdSense - For those of you who use their blog as one of their income sources, they are certainly familiar with Google AdSense. Google AdSense is a Google product that is one of the reasons and attractiveness of publishers to further develop their site. Although not all of them have the same reason.

How to Speed up Loading a Blog with Lazy Load for AdSense

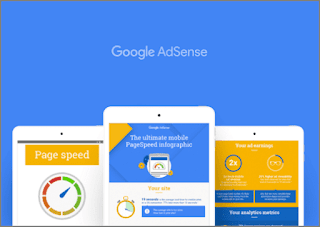
On the other hand AdSense is one of the contributors to loading because the ads displayed JS AdSense will reduce the loading speed of our blog even though JS AdSense already uses asynchronous, but still it will still make the blog wait longer to load. Come on, just for those of you who want to speed up loading their blog, please follow the following tips.

Speed up Loading a Blog with Lazy Load for AdSense

The way the code works is quite simple, that is, the ad will appear after we scroll the page. So AdSense JS will not appear before we scroll the site page.

These tips are intended for those of you who have installed AdSense on their blog. For those who haven't, the code that I will share can be used for other needs such as loading an external JS link.

Open Blogger >> Click the Themes menu >> Click the Edit HTML button >> Add the code below before </body> or &lt;!--</body>--&gt;&lt;/body&gt;

<script type='text/javascript'>
//<![CDATA[
// Lazy Load AdSense
var lazyadsense=!1;window.addEventListener("scroll",function(){(0!=document.documentElement.scrollTop&&!1===lazyadsense||0!=document.body.scrollTop&&!1===lazyadsense)&&(!function(){var e=document.createElement("script");e.type="text/javascript",e.async=!0,e.src="https://pagead2.googlesyndication.com/pagead/js/adsbygoogle.js";var a=document.getElementsByTagName("script")[0];a.parentNode.insertBefore(e,a)}(),lazyadsense=!0)},!0);
//]]>
</script>

If not, make sure to delete all AdSense JS links that are usually installed in the AdSense ad unit code. Like this :

<script async src="//pagead2.googlesyndication.com/pagead/js/adsbygoogle.js"></script>

This code can also be combined with the JS Adblock Killer link that I shared with my post. For those of you who have done the trick, you can use this code:

<script type='text/javascript'>
//<![CDATA[
// Lazy Load AdSense
var lazyadsense=!1;window.addEventListener("scroll",function(){(0!=document.documentElement.scrollTop&&!1===lazyadsense||0!=document.body.scrollTop&&!1===lazyadsense)&&(!function(){var e=document.createElement("script");e.type="text/javascript",e.async=!0,e.src="https://rawcdn.githack.com/Arlina-Design/quasar/23207858/arlinablock.js";var a=document.getElementsByTagName("script")[0];a.parentNode.insertBefore(e,a)}(),lazyadsense=!0)},!0);
//]]>
</script>

After adding click the Save theme button and finish.

Maybe you are asking, is this code safe for our AdSense?

The answer is of course safe. Because Google also suggested to speed up loading the blog as well as installing the Lazy Load Image code to speed up image loading on the site page.

And will it affect the AdSense revenue of our blog?

I don't know for this one, because I just installed it myself. Let's just see the progress, if the income is reduced maybe it really isn't our luck ... Eh, the solution is that you can revoke the code and restore it as before.

In conclusion, prioritize what you think is needed. If you want to blog faster, you can do the above tricks, but if you are still in doubt about AdSense revenue (which might be), you can just drop the intention to install it. But for me, I consider this as a new experience, what I value here is the progress "Will installing this code affect AdSense?" Well, that curiosity makes me more excited even though there are risks that need to be accepted.

That's tips that I can share this time about How to Speed ​​up Loading a Blog with Lazy Load for AdSense. Hopefully it can be useful and good luck.
List of the Highest Google AdSense CPC 2024

List of the Highest Google AdSense CPC 2024

List of the highest Google AdSense CPC 2024 - Google AdSense is an advertising collaboration service hosted by the giant Google company. From year to year, the number of AdSense publishers has increased along with soaring advertisers using Adwords services. One factor is the rapid development of internet users throughout the world.

List of the Highest Google AdSense CPC 2019

With the CPC (Cost Per Click) system, Google sets the price per click for each ad that varies. There are many factors that can affect the CPC value of an advertisement, including country territory and keywords or keywords. Has the question arisen as to why the value of Indonesian CPC is smaller than that of the United States? Then which country has the Highest CPC value?

What are the factors that make CPC Google AdSense ads different for each country?


High and low CPC AdSense is influenced by many factors ranging from niche blogs and keywords. Keywords relate to niche blogs themselves. Google will find out what many content is discussed on your blog via keywords in searches that lead to your blog. Google AdSense will filter eligible ads to appear on a blog that was previously auctioned (determine what ads and click prices).

Advertisers also target their ads to blogs with certain themes that are relevant to their products. So it is recommended to create one niche blog only. In addition advertisers will target keywords that have high and tight search levels because their ads have more opportunities to see.

In addition, the budget of a company that advertises also affects the value of ad clicks. Companies like Amazon can spend large amounts of money just to advertise. Just try to check how much CPC is from Amazon ads. Different if the advertiser is an individual or only a small company. Of course they don't want to lose just to promote their products. Because of that, expensive CPC can be because the price for placing ads is also high.

Which country has the highest CPC?


If you talk about the broadcasting area or ad targeting, of course Indonesia will lose to America. Obviously, more developed American countries have higher economic levels. Competition between advocates is very strict. So it is clear that advertisers spend a lot of money winning opportunities against their competitors on the level of popularity of advertisements.

That's why they want to pay for their advertising. As a publisher, of course this can be a great opportunity to earn income by targeting certain countries. Then which countries have the most expensive advertising (highest CPC)? Look at the CPC averages for each country below.

List of the highest Google AdSense CPC 2024


Here is a list of the highest Google AdSense CPC 2024. This list will continue to be updated for the highest cpc list for the following year

Rating Country
1 Australia
2 Amerika Serikat
3 Norwegia
4 Britania Raya
5 Selandia Baru
6 Afrika Selatan
7 Kanada
8 Belanda
9 Swedia
10 Swiss
11 Denmark
12 Jerman
13 Belgia
14 Singapura
15 Nigeria
16 Kuwait
17 Jepang
18 Irlandia
19 Finlandia
20 Perancis
21 Luksemburg
22 Malaysia
23 Austria
24 Hong Kong
25 Israel
26 Islandia
27 Slovenia
28 Slovakia
29 Uni Emirat Arab
30 Italia
31 Qatar
32 Botswana
33 Estonia
34 Spanyol
35 Bermuda
36 Ciprus
37 Russia
38 Ceko
39 Puerto Riko
40 Yunani
41 Arab Saudi
42 Albania
43 Oman
44 Latvia
45 Portugal
46 Lebanon
47 Kenya
48 Bahamas
49 Malta
50 Bahrain
51 Ghana
52 Mozambik
53 Jamaika
54 Zimbabwe
55 Hungaria
56 Brazil
57 Armenia
58 Tanzania
59 Rwanda
60 Trinidad dan Tobago
61 Lithuania
62 Ukraina
63 Chili
64 India
65 Taiwan
66 Panama
67 Polandia
68 Republik Dominika
69 Kosta Rika
70 Korea Selatan
71 Zambia
72 Uganda
73 Kongo (DRC)
74 Jordania
75 Maroko
76 Argentina
77 Meksiko
78 Makau
79 Thailand
80 Irak
81 Namibia
82 Kolombia
83 MonaKo
84 Ethiopia
85 Kroasia
86 Kazakhstan
87 Angola
88 Bulgaria
89 Filipina
90 Azerbaijan
91 Kamerun
92 Peru
93 Turki
94 Algeria
95 China
96 Georgia
97 Uruguay
98 Indonesia
99 Belarusia
100 Romania
101 Mesir
102 Moldova
103 El Salvador
104 Republik Makedonia (FYROM)
105 Ekuador
106 Gibraltar
107 Brunei Darussalam
108 Antillen Belanda
109 Serbia
110 Bolivia
111 Yaman
112 Palestina
113 Tunisia
114 Sri Lanka
115 Venezuela
116 Afghanistan
117 Kamboja
118 Senegal
119 Nepal
120 Sudan
121 Guatemala
122 Maladewa
123 Libya
124 Pantai Gading
125 Benin
126 Myanmar (Burma)
127 Bangladesh
128 Bosnia dan Herzegovina
129 Mauritius
130 Laos
131 Paraguay
132 Vietnam
133 Pakistan
134 Mongolia

It can be seen from 134 country lists based on Google AdSense CPC, Indonesia is ranked in the top 98. Indonesia's CPC is smaller than the other two Southeast Asian countries, namely Singapore and Thailand. In other words, Indonesia has a low CPC average. It is even possible that the most expensive advertising prices in Indonesia are still below the average CPC of America. That's the List of the Highest Google AdSense CPC 2024, which I can share this time. May be useful.
Create Ads Slots Before and After Posts

Create Ads Slots Before and After Posts

Create Ads Slots Before and After Posts - Actually the method is very easy, but for those of you who already know how to do it, you don't need to follow this method anymore because you have done this method before.

Create Ads Slots Before and After Posts

But, if you want to display ads, either banner ads or special AdSense ad units such as In-article Ads in the post, you can follow the tips I shared, about How to Create Ads Slots Before and After Posts. For more details, how to do it, you can immediately see the following steps.

How to Create Ads Slots Before and After Posts


First open the Blogger dashboard >> click the Themes menu and Edit HTML.

Then look for this code in the template

<data:post.body/>

Or

<p><data:post.body/></p>

More precisely, look for the code <data:post.body/> inside this markup

<b:includable id='post' var='post'>
....
....
<data:post.body/>....
....
</b:includable>

If in the template you have some code <data:post.body/> find the code that is wrapped with the conditional tag post page. Examples like this

<b:if cond='data:blog.pageType == "item"'>
<data:post.body/>
</b:if>

It can also be replaced with the Latest Blogger Conditional Tag format

If it's not there, you only need to add a new code like this

<b:if cond='data:blog.pageType == "item"'>
<data:post.body/>
</b:if>

Next add the code below to wrap the banner or ad code

<b:if cond='data:blog.pageType == "item"'>
<div class=khalista.blog'>
<!-- Your Ad Here --></div>
<data:post.body/>
<div class='khalista'>
<!-- Your Ad Here --></div>
</b:if>

Change the code marked with your banner or ad code. For example like this, here I use the AdSense In-article code.

<b:if cond='data:blog.pageType == "item"'>
<div class=khalista.blog'>
<ins class='adsbygoogle' data-ad-client='ca-pub-xxxxxxxxxxxxx' data-ad-format='fluid' data-ad-layout='in-article' data-ad-slot='xxxxxxx' style='display:block; text-align:center;'/><script>(adsbygoogle = window.adsbygoogle || []).push({});         </script></div>
<data:post.body/>
<div class='khalista'>
<ins class='adsbygoogle' data-ad-client='ca-pub-xxxxxxxxxxxxx' data-ad-format='fluid' data-ad-layout='in-article' data-ad-slot='xxxxxxx' style='display:block; text-align:center;'/><script>(adsbygoogle = window.adsbygoogle || []).push({});         </script></div>
</b:if>

Also add the CSS code below before </head> or &lt;/head&gt;&lt;!--<head/>--&gt;

<b:if cond='data:blog.pageType == "item"'>
<style type='text/css'>
.khalista{margin:20px auto 0 auto}
.khalista.blog{margin:20px auto}
</style>
</b:if>

Finish, click the Save theme button in the template editor.

Thus our tips about How to Make Ad Slots Before and After Fill in Posts on Blogger. Hopefully useful and good luck.
How to Verify Google AdSense PIN Address

How to Verify Google AdSense PIN Address

How to Verify Google AdSense PIN Address - Your payment is currently suspended because you have not verified the address, this is due to several reasons such as not verifying the address using PIN (Personal Identification Number), not sending tax information, not preparing payment methods and so on.

If you are using Google AdSense for the first time and do not know the next steps that need to be done, let's learn together here, I will share and share experiences with you from the very first list of adsense to enjoy revenue from Google Adsense. For the adsense list tutorial to be accepted, maybe I will post later, this time I will start by verifying the adsense pin.

How to Verify Google AdSense PIN Address

To verify the adsense address is a must do for every google adsense publisher. To protect the security of your account, Google requires you to verify the address before sending you payments. How to verify the adsense address, Google will send a Personal Identification Number (PIN) to the payment address in your adsense account or the address you used when registering. Next you need to enter the PIN number into your account.

How to Verify Google AdSense PIN

  • Enter the AdSense account.
  • Then click Settings > Account information > Verify the address
  • Open the envelope or letter from the post office that contains your adsense PIN.
  • Tear from the side, follow the line pattern that is already on the envelope.
  • Then enter your PIN then click Send PIN.

Note:

  • A PIN will be sent if the account balance has reached a minimum of $ 10.
  • A new PIN will be sent 3-5 days after the current date the PIN is made.
  • The PIN will be sent by post, maybe only up to 2-5 weeks or even longer depending on your location.

General Questions Regarding Address Verification (PIN)


There are a number of questions that are often asked by the google adsense publisher whether those who display ads on Blogger, YouTube, Admob and other google partners, which I quote from the FAQ verification address as below:

When will I receive a PIN?


Google will print and send your PIN by mail, usually the PIN will be received within 2-4 weeks, or even longer, depending on your location. A PIN will be sent if the balance on your account has reached a verification threshold of at least $ 10 or Rp. 130,000.

When do I need to enter a PIN?


As soon as possible, verify your PIN on your account if you have received a letter from the post containing the Google Adsense account PIN, you have a maximum of four months from the date the first PIN was made. If more than four months you have not verified your account, then Google will stop showing ads on your page.

Where can I enter a PIN?


After you receive your PIN, verify the account on your adsense account information page.

What if I don't receive a PIN?


Some people may experience this, can be caused by several factors such as incorrect writing the address so that stuck in the post office or there are other things that cause the adsense pin letter does not reach your address. Therefore you can request a new replacement PIN.

What if my address is wrong?


Before requesting a new PIN, make sure that the payment address in your AdSense account is correct. If there is an error in writing the address or you have moved to a new address, please change the payment profile address in your AdSense account.

Can I send a copy of my official identity?


Depending on several locations, you can send official documents such as KTP / SIM / Passport as proof of address to Google. If you qualify you will see a notification on the AdSense account home page about how to submit official documents to Google.

That is the article on How to Verify Google AdSense PIN Address. hopefully with these brief tips, it can be useful for you. Thanks.
Can Youtube Adsense Accounts be Installed on Blogspot?

Can Youtube Adsense Accounts be Installed on Blogspot?

Can Youtube Adsense Accounts be Installed on Blogspot - Adsense tips next time will discuss a question about whether to install an adsense account from Youtube to Blogspot/Blogger? This is of course related to changes to Google's current policies. Actually, a few years earlier, to link between Google Adsense accounts from Youtube or Blogspot/Blogger can be linked to each other. That is, an Adsense account from anywhere can be installed on both.

Can Youtube Adsense Accounts be Installed on Blogspot?

However, a few years later the rules were changed. Adsense accounts that are registered via Youtube, can no longer be installed on Blogger or Blogspot, and vice versa. Unless the Adsense account has a non-hosted Adsense account status.

One easy trick to get an Adsense account, which is to register via Youtube


Most certainly agree to get one Adsense account that is difficult not to play, especially for beginners. Let alone to get an Adsense account Non-hosted Adsense Hosted accounts are fairly difficult to obtain.

This is compounded by the requirements that must be met by the blog. A blog cannot be registered directly. At least some specific processes and achievements need to be met first. Starting from the navigation of the blog template that must be clear (not the beta version of the blog), you must really have enough visitors, articles or posts with a certain amount, level of induction (ranking) in search engines that must be adequate, and so forth.

As if that requirement was felt to be insufficient, to wait for confirmation also needed to wait several days, even weeks.

That way, it's no exaggeration to say that registering Adsense from a blog is very difficult to accept. An easier alternative to get an Adsense account is to monetize videos on Youtube. Because it is trusted, to get a Google Adsense account from Youtube is quite easy.

The requirement is not as much and as hard as registering Google Adsense with a blog. What is needed is as follows:
  • One Google email that was not registered for Google Adsense before
  • Make a Youtube channel
  • Upload original (homemade) videos on a Youtube account
  • Register your Adsense account directly from the Youtube channel by linking it through the button provided

After that, please wait a moment. Some cases have been registered and received with less than an hour. Google Adsense account is ready to use, with Hosted status. This means that it cannot be installed on Blogspot / Blogger and can only be used to monetize Youtube videos.

Then, can a Google Adsense account from Youtube be linked or posted to a blog?


The answer is of course CAN. To ensure that, please find the answer further in the "Google statement" on their support page. But the requirement is that the Adsense account must be upgraded first to a Non-hosted account.

To upgrade the Adsense Hosted account to become Non-hosted, you need to bother a little by providing a Top Level Domain (TLD) blog or website, aka already having a personal domain, not dot blogspot dot com anymore.

If you already have a TLD blog, please do the following steps:
  • Visit the official "Google Adsense" link, log in with an Adsense account from Youtube
  • Click the gear icon, select after or settings
  • Select the menu and click Access and authorization
  • In the show ads section on other websites, please fill in the domain URL (TLD) that you want to display Adsense ads
  • Then press the Send button
  • Next you are asked to make one ad slot and install the ad code on the blog that you registered earlier.
  • Finally, you need to wait for a review from Google about the submission. It usually takes several days, even weeks.

At the review stage, you need to do special treatment on the blog or website that you registered, so that your request can be approved immediately.

If your blog / website is considered eligible to display Google Adsense ads, then the blog will immediately be accepted. In other words, it can be ascertained that the Youtube Adsense account that was originally Hosted will change its status to Non-hosted.

So information about Adense tips this time about Is an Adsense Youtube Account installed on Blogspot? Hopefully useful and good luck.
How to Remove the Blog Title on Google AdSense Matched Content

How to Remove the Blog Title on Google AdSense Matched Content

How to Remove the Blog Title on Google AdSense Matched Content - As we know, Matched Content is one of the features of Google AdSense that serves to display a row of related posts based on the label in the post. The way it works is more or less the same as the Related Post widget in Blogger that you normally see in the templates that add it.

On the Google AdSense dashboard you can create Matched Content ad units and can also be modified in the settings. But there are obstacles when it appears on the blog that the blog title appears in the row of links that are displayed and it will be a little annoying because the link is longer.

How to Remove the Blog Title on Google AdSense Matched Content

The benefits of this ad unit for blogs are:
  • Increase Pageview on blogs
  • Increase readers who are faithful in reading blog content
  • Will have a good impact on increasing advertising revenue

Eliminating Blog Title on Google AdSense Matched Content


In Blogger Tips, I will provide a solution for how to Eliminate Blog Title in Google AdSense Matched Content. For those who experience this problem, let's look at the method below.

Login to Blogger >> Click the Theme menu and click the Edit HTML button >> Find and delete the meta tag below

<meta expr:content='data:blog.pageTitle' property='og:title'/>

Change with the code below

<meta expr:content='data:blog.pageName' property='og:title'/>

Click the Save theme and finish button. Then check the changes on your blog. Easy enough isn't it? If there are still no changes, it usually takes time to remove the blog title on Matched Content. To adjust the appearance of Matched Content you can visit this link

So many tips that I can share this time about How to Eliminate Blog Title on Google AdSense Matched Content, hopefully useful and good luck.
How To Ads Not Displaying When Preview Articles

How To Ads Not Displaying When Preview Articles

How To Ads Not Displaying When Preview Articles - To hide or deactivate the appearance of an ad when opening an article preview page, we need a special conditional tag. And these conditional tags have only been around since 2017.

Leaving the ad slot still appearing on the post preview page does not have a significant effect on related blogs and Google Adsense accounts. It's just that, the appearance that is often blank is what sometimes disturbs the view when you want to preview prospective blog posts.

How To Ads Not Displaying When Preview Articles

Well, if the appearance of the ad in the preview / preview page of this post also interferes with your comfort, then do the following.

For ads in posts (at the bottom, middle and end of the post)


Go to Blogger >> Theme >> Edit HTML.

Insert this conditional tag in the ad slot:

<b:if cond='!data:view.isPreview'>
<! - Ad code here ->
</b:if>

Example:

<b:if cond='!data:view.isPreview'>
<ins class='adsbygoogle' data-ad-client='ca-pub-XXXXXX' data-ad-format='rectangle' data-ad-slot='XXXXXXXXXX' style='display:block'/>
<script>
(adsbygoogle = window.adsbygoogle || []).push({});
</script>
</b:if>

For ads in widgets (headers, sidebar and footer)


Still in Edit HTML. Use the Jump to widget feature to go to the html widget in your blog template. An example is like this picture:

How To Ads Not Displaying When Preview Articles

How To Ads Not Displaying When Preview Articles

For example, your ad slot is in HTML2. After being in the widget code, please add the code cond='!data:view.isPreview' on the left of the code id='HTML2'.

Examples like this:

<b:widget cond='!data:view.isPreview' id='HTML2' locked='false' title='Advertisement' type='HTML'>...</b:widget>

Then save the theme.

Do the same with other ad slots.

These are tips that I can share about How To Ads Not Displaying When Preview Articles. Hopefully with these brief tips, it can be useful for you. Good luck.
How to Display Adsense Ads Based on Article Authors

How to Display Adsense Ads Based on Article Authors

How to Display Adsense Ads Based on Article Authors - Blogging tips this time about how to make Adsense ads appear based on article writers in a blog. In the sense, Adsense ads will alternate appear according to the author of the article along with the ad slot installed by the blog owner based on the ad slot slot that has been determined. This trick is usually used on blogs that have multi-user or multi-admin, or also blogs that provide the opportunity for guest writers (contributors) to write several articles on the blog.

How to display Adsense ads alternately based on the author of this article can be applied to the Blogger and Wordpress platforms. Wordpress itself has many plugins that can be used to provide access as intended, which is usually configured on the user role. However, it's different with Blogger, to make this kind of thing we are only limited to using conditional tags. However, that alone is very helpful for blog admin / webmaster to share income with guest writers or contributors on his personal blog.

How to Display Adsense Ads Based on Article Authors

So, actually this should be the initiative of the blog owner himself. That he wants to share his Adsense income with contributors or guest writers on his blog. This is also intended to give more encouragement to guest writers and provide income opportunities for them to be more diligent in updating articles on the blog. Especially for bloggers who have not been successfully accepted as Google Adsense publishers.

How to share Adsense ads that will be displayed alternately based on the article writer?


To apply this trick, the blog owner (who is also the owner of an Adsense account) uses the Channel feature contained in the Adsense account. That is, the blog owner must create an ad slot for each of the existing contributors. Then the ad slot is created again in a Channel.

This needs to be done so that it is easy to calculate the distribution of results obtained by each contributor / guest writer. Speaking of the sharing of results, because the ads displayed are the property of the blog admin, then the distribution of advertising results should be discussed first. Until you get a consensus that benefits each other.

How to find out the amount of income earned if you use this trick?


In this case, the contributor must trust the blog admin, and the blog admin should provide income reports in a certain vulnerable time. Whether it's every day, a month 3 times or once a month, or according to the agreement and user role that has been determined.

How to display ads according to the author's post / article writer


Well, to display ads alternately according to the article author, the way is very easy. We only need to use conditional tag author, both for Blogger or Wordpress. The following are examples of their use:

Example of using Blogger's special conditional tag author:

<b:if cond='data:post.author == &quot;KhalistaBlog&quot;'>
HERE ADSENSE ADVERTISING CODE
</b:if>

Examples of using Wordpress-specific conditional tags:

<?php if (is_author( 'KhalistaBlog' )) { ?>
HERE ADSENSE ADVERTISING CODE
<?php } ?>

From the example of using the conditional tag author above, if articles / posts are written by "KhalistaBlog", then the Adsense ads that appear are Adsense ad slots contained in the Channel author. This also applies to posts / articles belonging to other authors.

Do not forget, if the ad slot wants to be displayed under the post or in the post, then the ad code must be parsed first.

Easy enough isn't it?
This is the information about how to display Adsense ads based on author posts or article writers. Hopefully useful and good luck.
How to Hide AdSense on Blog Search and Label Pages

How to Hide AdSense on Blog Search and Label Pages

How to Hide AdSense on Blog Search and Label Pages - Running ads on the search label page and especially search blog posts, is an action that is very risky for the health of Google Adsense accounts. You might get an Adsense account banned. Because, we as blog / website owners can not control the fad of visitors who can modify the label search URL, and enter the keyboard search page, with keywords that have nothing to do with blog content, and even tend to be inappropriate.

How to Hide AdSense on Blog Search and Label Pages

Even more so if visitors are angry because of family problems or because of debt problems, and vent their anger on the Adsense account installed on our blog, through the blog search column (data:blog.searchQuery) or modify the URL label search page link (data:blog.searchLabel) becomes something that smells of adult keywords or 18+.

For example, the blog URL from the results of visitors when using the blog search widget, it will be like this:

https://setupgaming.blogspot.co.id/search?q=download+video+meler+mp3.5

Or if the blog label page's search URL is modified, it will look like this:

https://setupgaming.blogspot.com/search/label/Download%20Video%20meler&amp;max-results=8

download+video+meler+mp3.5 and Download%20Video%20meler is a keyword that is inappropriate for the results of blogging. Whereas obviously the blog discussed about the setup of cheap gaming laptops. In fact modified into something slimy.

Attention: Keep in mind, even though the keyword search blog page and URL of the search labels page are not contained in the blog content, the page will not be redirected to page Error 404. He will still open on his own page.

On the other hand, displaying Google Adsense ads on blog article search pages, it should not be necessary. Because there is no effective content on the page. If a blog page does not have effective content, then the page is not suitable to display Adsense ads. Apply the following ways to keep your Adsense account from being banned, before it's too late.

How to hide Adsense ads in the header, sidebar or footer if you use the HTML/JavaScript Widget


1. Make sure you already know the HTML ID for the Adsense ad code widget on your blog. That is by going to Layout, click edit on the HTML / JavaScript widget that contains the ad code.

In this tutorial, suppose the attribute ID for your Adsense ad code is "HTML2"

2. After that go to Theme >> Edit HTML, look for the "HTML2" code. The trick press the ctrl + f key then type "HTML2" in the search field that appears, then press enter.

How to hide Adsense ads in the header, sidebar or footer if you use the HTML/JavaScript Widget

3. In the HTML2 ID attribute, find the code <b:includable id='main'> then put the following conditional tag code under the code:

<b:if cond='data:blog.pageType == &quot;index&quot; and data:blog.url != data:blog.homepageUrl'>
<b:else/>

4. Still on the same attribute ID, find the code <b:includable> then place the closing code of the following conditional tag just above the code:

</b:if>

So that for steps 3 and 4, the method of implementation will look like in the following picture:

How to hide Adsense ads in the header, sidebar or footer if you use the HTML/JavaScript Widget

5. After that Save the Theme.

How to hide the Adsense ad code inside the HTML template


Even though in the HTML theme, this type of advertisement is always displayed in all pages, such as Ads Page Level ads, or floating ads.

1. The trick is easier than the one before, which is to stay like this:

<b:if cond='data:blog.pageType == &quot;index&quot; and data:blog.url != data:blog.homepageUrl'><b:else/>
Adsense ad code is placed here….
</b:if>

2. After that Save the Theme.

Actually there are still other ineffective pages for Adsense ads, such as the 404 Error page and static pages. If this page is combined with a blog search page and label search, the way to implement it will be like this:

<b:if cond='data:blog.pageType == &quot;index&quot; and data:blog.url != data:blog.homepageUrl'>
<b:else/>
<b:if cond='data:blog.pageType != &quot;static_page&quot; and data:blog.pageType != &quot;error_page&quot;'>
Adsense ad code is placed here…
</b:if>
</b:if>

Or if you want to keep showing ads on static pages, and don't want to display ads on the blog search page, search label, and 404 error page page, then the way to implement it will be like this:

<b:if cond='data:blog.pageType == &quot;index&quot; and data:blog.url != data:blog.homepageUrl'>
<b:else/>
<b:if cond='data:blog.pageType != &quot;error_page&quot;'>
Adsense ad code is placed here…..
</b:if>
</b:if>

Anyway, just play your Conditional Tag, according to the concept you want. Until now, the way to hide Adsense ads above is still 100% effective to avoid banned Adsense ads from the things mentioned above.

As an additional note, the above method can not only be applied to Google Adsense ads, but other ads. It's just that Adsense is more stringent, so the focus is on Adsense.

That's the tutorial that I can share about How to Hide AdSense Ads on Blog Search and Label Pages. Hopefully it can be useful and good luck.
How to Overcome Google AdSense Rejection Due to Navigation Problems

How to Overcome Google AdSense Rejection Due to Navigation Problems

How to Overcome Google AdSense Rejection Due to Navigation Problems - This time I will review one of the common problems that often occur about Google AdSense Rejection Due to Navigation Problems. Besides being inadequate content, site navigation issues are often a problem with Google Adsense rejection. Unfortunately, many bloggers do not understand what is meant by rejection due to site navigation problems.

How to Overcome Google AdSense Rejection Due to Navigation Problems

Causes of Google AdSense Rejection due to Navigation Problems


In general, there are several reasons and reasons why Google AdSense is related to the navigation problem of this site starting from:

  • Google found the site difficult to explore both by Crawlers and readers
  • The menu navigation is unclear
  • Menu navigation is not User Friendly, meaning it is not friendly to readers / visitors (confusing)
  • There is a broken link on the menu navigation
  • The URL of the destination page is empty menu navigation
  • Excessive pop-ups
  • Violate the rules and policies of the Google AdSense program
  • The page behind the login / access process is restricted
  • Dialers Program
  • The site's unpreparedness for submission to AdSense
  • Pages that are being created or not yet launched

From a few points above, maybe what is a little confusing is the excessive Pop-up problem. Because in fact, Google does not provide further clarification about this Pop-up problem, whether it is a Pop-up, redirect link or other advertising.

Overcoming Google Adsense Rejection Due to Navigation Problems


Personally, to be honest I have never experienced this problem because what I most often experience is being rejected by AdSense because the content is inadequate. Furthermore, if your site is rejected by Google AdSense because of problems with site navigation, there are several efforts that you can do, including:

  • The site must be easy to explore, both by Crawler and readers
  • Site navigation must be clear and not confusing
  • All page URLs targeted at site navigation contain active URLs and have articles in each category
  • Avoid, replace, or change the damaged URL in the site navigation menu
  • As long as the website is submitted to AdSense, avoid the redirect URL (URL Redirect) he other pages
  • Avoid using the Dialers Program
  • Make sure all URLs are active and nothing is damaged

Then you also have to be willing and able to comply with all AdSense rules and policies and review whether the site is ready for Google AdSense or not at all. That is what is the reason why your site was rejected by Google AdSense because of navigation problems and how to overcome and fix it. So a few tips that are quite short from me, hopefully useful and good luck.
How To Add Adsense Ads In The Post With Callers Using JavaScript

How To Add Adsense Ads In The Post With Callers Using JavaScript

How To Add Adsense Ads In The Post With Callers Using JavaScript - In this trick you will place the Adsense ads in the post with the caller. With this trick then we can save Adsense ads anywhere in the post according to our will. Actually this is almost the same as how to save Adsense ads in the post manually, only here we do not store the ad code directly in the post, but we only save the caller code only.

So with this we can easily replace ad units or replace ads with other accounts without having to edit the posts one by one. We just need to replace the ad code in HTML edit only.

Actually on Google has many articles that discuss how to store adsense ads in the post automatically, but there are some bloggers who feel uncomfortable with the way because of the placement of ads in the post out of our control in full.

How To Add Adsense Ads In The Post With Callers Using JavaScript

For that you can try this trick, so the ads will appear in accordance with our will. To start trying to save Adsense ads in the middle of posting with this caller, For more details can directly follow the steps below.

How To Add Adsense Ads In The Post With Callers Using JavaScript


Go to Blogger >> Settings >> click the Theme menu >> Edit HTML, Then, place the following code, above the code </body>

<script>
//<![CDATA[
var element = document.getElementById("insertad");
element.innerHTML = "<ins class='adsbygoogle' data-ad-client='xxxxxxxxxxxxx' data-ad-format='auto' data-ad-slot='xxxxxxxxx' style='display:block'></ins>";
var newScript = document.createElement("script");
var inlineScript = document.createTextNode("(adsbygoogle = window.adsbygoogle || []).push({});");
newScript.appendChild(inlineScript);
element.appendChild(newScript);
//]]>
</script>

Please replace the code I marked with such code from your Adsense ad code. Notice each quotation mark of the ad code with single quotes instead of double quotes.

Then please use this code to call ads, please save in the post as you want in the mode of posting HTML.

<div id="insertad"></div>

If you want to save another ad, please create again the code above with a different caller ID. You can use the following code for the second ad.

<script>
//<![CDATA[
var element2 = document.getElementById("insertad2");
element2.innerHTML = "<ins class='adsbygoogle' data-ad-client='xxxxxxxxxxxxx' data-ad-format='auto' data-ad-slot='xxxxxxxxx' style='display:block'></ins>";
var newScript2 = document.createElement("script");
var inlineScript2 = document.createTextNode("(adsbygoogle = window.adsbygoogle || []).push({});");
newScript2.appendChild(inlineScript2);
element2.appendChild(newScript2);
//]]>
</script>

And use this code to call the second ad, please save it in the post as you wish in the HTML posting mode.

<div id="insertad2"></div>

Done, and you can see the results.

That's the tips I can share, about How To Add Adsense Ads In The Post With Callers Using JavaScript. Hopefully with articles that I have shared above can be useful and useful for you all. Good luck.
Tips and How to Overcome Adsense Click Bombs

Tips and How to Overcome Adsense Click Bombs

Tips and How to Overcome Adsense Click Bombs - One of the most important things that can boost our totality in maintaining the existence of the whole blogging art is to have an AdSense account and run it to commercialize the site or blog that we have in order to get additional sustenance so that we are tired of being completely paid off.

In the midst of harmony in partnership with Google AdSense, there is a phenomenon that is not uncommon and this can be a threshing spirit of the blogger, it is a Click Bomb. Maybe this sounds a little strange to those of you who are honeymooners with AdSense.

Tips and How to Overcome Adsense Click Bombs

You need to know that in the world of online Ads business classmates like Google AdSense, click bombs are common. If this happens to a new AdSense account then it is likely that the account is suspended by Google so that it can no longer serve its ads for a while or even forever.

Therefore, on this occasion I will share Tips and How to Overcome Adsense Click Bombs. So you can all anticipate the occurrence of Click bomb on the Adsense you use.

What is a Click Bomb?


Click bombs are very many clicks with the number of tens or even thousands of clicks from one user's computer IP or more and occur in a very short time so that it exceeds the clickthrough rate of the ads that have been calculated by Google AdSense. If this happens then AdSense will assume there have been invalid clicks (click fraud) and the account is susceptible to suspend or even permanently banned.

Tips and How to Overcome Adsense Click Bombs


Most likely the click bomb is done by parties who do not like the existence of our blog, it could be a competitor or a joke visitor. Here are some tips on how to prevent and overcome adsense click bombs.

Increase your blog's trust

Building trust is the key to making blogs safe from click bombs. People who make unnatural clicks must have certain reasons, show that there are bloggers who are friendly to visitors or other bloggers.

Avoid conflicts between fellow bloggers

Adsense click bomb actions can be caused by people who don't like you, you may have conflicts with the perpetrators. Well, this kind of character often happens, so you should be more careful.

Theft of other blog content (copas)

There are several typical bomb clicks that resulted from content diuri or in Copas. So you should try not to copy other blogger content.

Because of random spam

Spam activity is often the case, even though the goal is to get traffic but it is not uncommon to get disaster. Therefore you should avoid activities or spread links carelessly.

Don't show off

There are some bloggers who have the "show" nature, both show off traffic and show off income. This often happens in groups or blogger forums where there are arrogant showcases and immediately the blog is invaded.

Don't bomb other people's adsense

Like peppers "ready to plant must be ready to harvest", so try not to do a bomb click on someone else's blog. Just remember karma must apply.

What To Do When We Know Which Account Is In The Click Bomb?


When caught an account is being bombed clicks, the most appropriate action is to unlink the site from the AdSense account, so the Google will know your business to avoid the action so that the possibility of the account is not suspended by Google and other than that the number of clicks are not repeatedly will affect the account.

The characteristics of the account hit by a click bomb that is suddenly rising earnings with a large amount, RPM and CPC also rose, in addition to the acquisition of more clicks than the page view as shown in Figure 1 above.

Here are the steps to uninstall a site from an AdSense account when a bomb clicks:

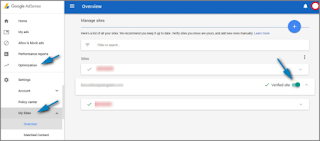
Go to the AdSense dashboard >> Settings >> My Sites >> Select a site that will be temporarily removed due to a problem with a click bomb. For more details, consider the following picture:

Tips and How to Overcome Adsense Click Bombs

To remove a site that was allegedly problematic with a bomb click then please follow the steps above in sequence, slide the toggle marked with number 3 towards the left. That way the account will remain safe because the site is no longer connected to AdSense.

The above step is done if you know the ads on the site page hit by bomb clicks, if you have many sites that are connected with AdSense pal as in the picture above, then it should be off only all sites connected to AdSense is temporarily until the situation is completely really conducive.

So if the site has high traffic, then it is likely to be saved from being banned so that the account continues to exist as usual despite a click bomb. If a click bomb occurs on a new account, then it's likely Google will immediately suspend the account. Seconds the occurrence of a click bomb that the balance will rise suddenly then it will come down again after a while until the normal number.

A good and friendly attitude towards anyone, especially in cyberspace is a strong protection from crime. Immediately uninstall the site that is connected with AdSense if you know the click bomb is happening, because then the ads on the site page will not have any effect even if clicked hundreds or even thousands of times.

Some tips that I can share about Tips and How to Overcome Adsense Click Bombs. Hopefully with this short article, it can be useful and useful for all of you. Thank you for visiting.
How to Add Google Custom Search Engine in Blog

How to Add Google Custom Search Engine in Blog

How to Add Google Custom Search Engine in Blog - Search box widget is one important part of a blog, because if there are visitors who find it difficult to find articles on their blogs can search easily through the Widget Search Box.

How to Add Google Custom Search Engine in Blog

Here I recommend using Google's special search on blogs, as the results will be more relevant and more complete than the regular search function. Moreover if you is a Google AdSense Publisher. Buddy can easily monetize blogs with this special search box. Later, AdSense ads will appear on the blog search results page.

Create a Google Custom Search Engine


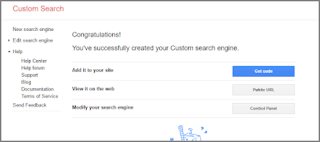
1. Please visit the Google Custom Search site

2. Next please click "Create a custom search engine" to login to CSE

How to Add Google Custom Search Engine in Blog

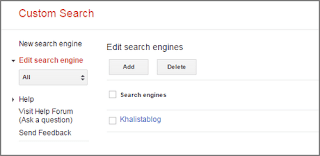
3. After logging into the CSE dashboard, click on "New Search Engine"

How to Add Google Custom Search Engine in Blog

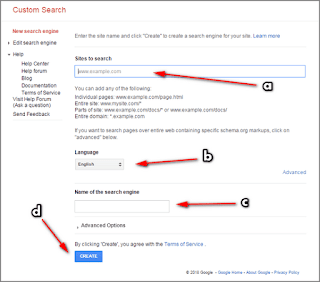
4. Then "content blog" as shown below

How to Add Google Custom Search Engine in Blog

a. Fill in your blog url
b. Change language settings according to the language used
c. Name of search engine
d. After defining the above settings, click the "CREATE" button

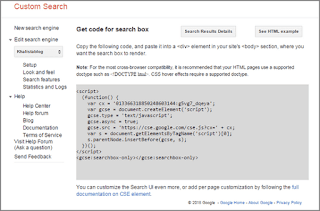
5. Then click the "Get code"

How to Add Google Custom Search Engine in Blog

6. Copy the script provided in the box

How to Add Google Custom Search Engine in Blog

Addendum: To create a Google Custom Search Widget to Valid HTML5, please replace the code below (obtained from step 6)

<script>
  (function() {
    var cx = '004846510630198233812:gmb5qovgjko';
    var gcse = document.createElement('script');
    gcse.type = 'text/javascript';
    gcse.async = true;
    gcse.src = 'https://cse.google.com/cse.js?cx=' + cx;
    var s = document.getElementsByTagName('script')[0];
    s.parentNode.insertBefore(gcse, s);
  })();
</script>
<gcse:searchresults-only></gcse:searchresults-only>

Replace the code marked with the code below

This applies to all layouts, like <gcse:search>, <gcse:searchbox>, <gcse:searchresults>, or <gcse:searchbox-only>

<div id="gcsengine"></div>
<script>
var gcseDiv = document.getElementById('gcsengine');
gcseDiv.innerHTML = '<gcse:searchresults-only></gcse:searchresults-only>'
</script>

So the result will look like this

<div id="gcsengine"></div>
<script>
var gcseDiv = document.getElementById('gcsengine');
gcseDiv.innerHTML = '<gcse:searchresults-only></gcse:searchresults-only>'
</script>
<script>
(function() {
var cx = '004846510630198233812:gmb5qovgjko';
var gcse = document.createElement('script');
gcse.type = 'text/javascript';
gcse.async = true;
gcse.src = (document.location.protocol == 'https:' ? 'https:' : 'http:') +
'//cse.google.com/cse.js?cx=' + cx;
var s = document.getElementsByTagName('script')[0];
s.parentNode.insertBefore(gcse, s);
})();
</script>

Add the Google Custom Search Engine Widget to your Blog


Login to Blogger >> Layout >> Create new widget (HTML / JavaScript) >> Add the code that was copied to new widget >> click Save and see result.

Monetize Google CSE with AdSense


1. Make sure you already have a blog that can be added Google AdSense

2. Please log in on Google CSE

3. Click the Name of the Search Engine that has been created earlier

4. Select Setup Menu

5. There is Basics Tab, Make money, Admin, and Indexing. Well, Please click the Make money tab.

How to Add Google Custom Search Engine in Blog

6. Please click the Active button on the Search Engine Monetization option.

Modify Ordinary Search Box by Adding Custom Search Engine Functions


1. If you want to install CSE function on search box that already exist in template, Please log in at Google CSE >> Click on Basics menu >> There is our unique Search engine ID given Google Search Engine >> Click the Search engine ID button >> Then copy the code inside notepad.

How to Add Google Custom Search Engine in Blog

2. Still in the Basics menu, click the Advanced button >> Replace Search engine encoding with West European Latin-1 (ISO-8859-1).

How to Add Google Custom Search Engine in Blog

3. Next login to Blogger >> Create post for static page >> Copy code obtained from CSE, code example:

<div id="gcsengine"></div>
<script>
var gcseDiv = document.getElementById('gcsengine');
gcseDiv.innerHTML = '<gcse:searchresults-only></gcse:searchresults-only>'
</script>
<script>
(function() {
var cx = '004846510630198233812:gmb5qovgjko';
var gcse = document.createElement('script');
gcse.type = 'text/javascript';
gcse.async = true;
gcse.src = (document.location.protocol == 'https:' ? 'https:' : 'http:') +
'//cse.google.com/cse.js?cx=' + cx;
var s = document.getElementsByTagName('script')[0];
s.parentNode.insertBefore(gcse, s);
})();
</script>

Copy the code as above into the static HTML post tab >> Then Publish post. Suppose you create a static post with the title "Search CSE", then the url in the can is "your_blog.com/p/search-cse.html".

4. Next open Template >> Edit HTML >> Search HTML from Search Box on template >> Here is sample HTML Search Box on blog template that I use.

<form action='/search' class='searchform' method='get'>
<table>
      <tbody>
        <tr>
          <td class='search-box'>
            <input id='search-box' name='q' onblur='if(this.value==&apos;&apos;)this.value=this.defaultValue;' onfocus='if(this.value==this.defaultValue)this.value=&apos;&apos;;' type='text' value='Search...'/>
          </td>
          <td class='search-button'>
            <input id='search-button' type='submit' value=''/>
          </td>
        </tr>
      </tbody>
    </table>
</form>

5. Then add this code in your search box

<input type='hidden' name='cx' value='partner-pub-004846510630198233812:gmb5qovgjko' />
<input type='hidden' name='cof' value='FORID:10' />
<input type='hidden' name='ie' value='ISO-8859-1' />

The marked code is the code of the Search engine ID that was copied in notepad, replace the code marked with the code of Search engine ID of your blog.

6. Then look at the code below

<form action='/search' class='searchform' method='get'>

Please replace the code above with the code below

<form action='your_blog.com/p/search-cse.html'  class='searchform'>

7. Then the result will be like this

<form action='your_blog.com/p/search-cse.html' class='searchform'>
<input name='cx' type='hidden' value='partner-pub-004846510630198233812:gmb5qovgjko'/>
<input name='cof' type='hidden' value='FORID:10'/>
<input name='ie' type='hidden' value='ISO-8859-1'/>
<table>
      <tbody>
        <tr>
          <td class='search-box'>
            <input id='search-box' name='q' onblur='if(this.value==&apos;&apos;)this.value=this.defaultValue;' onfocus='if(this.value==this.defaultValue)this.value=&apos;&apos;;' type='text' value='Search...'/>
          </td>
          <td class='search-button'>
            <input id='search-button' type='submit' value=''/>
          </td>
        </tr>
      </tbody>
    </table>
</form>

8. Save the template and see the results.

Such is the tutorial tips that I can share about How to Add Google Custom Search Engine in Blog. Hopefully with a short enough article this can be useful and good luck.

Source: https://www.arlinadzgn.com/2016/04/memasang.google.custom.search.engine.di.blog.html
What is Difference Between Hosted and Non Hosted Adsense Account

What is Difference Between Hosted and Non Hosted Adsense Account

Difference Between Hosted and Non Hosted Adsense Account - Google AdSense is one of the Google products in the form of an advertising platform for publishers to display ads on their products or content, Google Adsense or commonly called adsense has two types of account that is Hosted Account and Non Hosted Account.

What is Difference Between Hosted and Non Hosted Adsense Account

The difference between hosted and non hosted adsense accounts is raised because Google has many products that can work with Google AdSense and to make it easier to apply for cooperation.

Difference Between Hosted and Non Hosted Adsense Account


Hosted Account

Hosted accounts are accounts associated with other Google products like Blogspot and YouTube. Users who want to connect their Blogspot account or their YouTube account to AdSense will be more easily accepted if using Hosted Account. This also applies to other Google products like Play Store and more.

However, this Hosted Account Account is not easy to request displaying ads on other products such as websites or blog sites. But it will be very easy to approve the submission if it is filed for a Google product such as YouTube.

Non Hosted Account

Is a pure Google AdSense account created without any other Google product intermediaries. This account was created purely from scratch on the Google AdSense website page for the website.

When signing up for Google AdSense purely like this, you sign up for Google AdSense to show ads on websites or in products other than Google products. The advantage of having an AdSense Non Hosted account is not easy on the block, because Hosted Account has additional policies related to the product.

Of course it will be wider your reach because it can pair ads anywhere with Non Hosted account this. There are even some people who open cooperation such as displaying ads on your site without the need to have Non Hosted Google AdSense account. Cooperation is usually the income will be divided by 20 or what percent percent according to the policy of the account owner.

Which account should I have?


It depends on your activities and needs. If you are active in a Google product like YouTube or Blogspot then simply create a Hosted Account just because approval will be easier. But if you are moving on a website or other products other than Google products then it should create a Non Hosted Account, this submission is certainly not easy.

Can I Post Other Ads In Google Products Using Hosted Accounts?


Yes, of course you can. On the menu on the Google AdSense page there is no such thing as Other Products that use to propose advertising outside Google products such as personal web sites. This is not easy to agree on but there is nothing wrong if you want to try.

So the conclusion of the above explanation, that Hosted Account or Non Hosted Account has the same policy base that is Google AdSense policy and policy in each Country, but for Hosted account have another addition that is policy of Google product concerned.

A little secret you may want to know, writers or bloggers are very very eager to have a Google Non Hosted account and it is not easy to get it even to this day there are still waiting and trying to apply several times for Non Hosted account.

From that conclusion, I think if your email is connected to a Hosted account and have a website or product other than Google products I suggest trying to create a Non Hosted account. Because it gets harder (instead of making non hosted from scratch) if the Hosted account wants to apply for products other than Google.

A few explanations from me about Difference Between Hosted and Non Hosted Adsense Account. Hopefully with this article I have written, it can be useful for us all. Thanks for visiting.
How to Add Banner Ads Hover on Right and Left on Blog

How to Add Banner Ads Hover on Right and Left on Blog

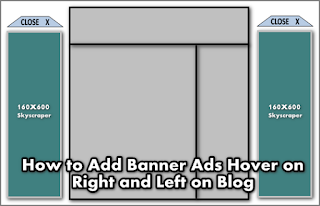
How to Add Banner Ads Hover on Right and Left on Blog - This time I will give tutorial How To Add Banner Ads Hover in Right and Left Blog. In this hovering ad, the ad view will be visible on the right side and left side of the blog. So it's not just one ad but two banner ads.

How to Add Banner Ads Hover on Right and Left on Blog

How, are you interested to install it? If you are interested, you can immediately follow the following steps.

How to Add Banner Ads Hover on Right and Left on Blog


Login to Blogger >> Then click on Layout >> Create New Widget >> Then copy the code below in it.

<style scoped='' type="text/css">
#iklankirikanan{position:fixed;_position:absolute;top:0;right:0;width:160px;clip:inherit;_top:expression(document.documentElement.scrollTop+
document.documentElement.clientHeight-this.clientHeight);_left:expression(document.documentElement.scrollLeft+ document.documentElement.clientWidth - offsetWidth)}
</style>
<script type="text/javascript">
function get_cookie(Name){var search=Name+"="var returnvalue="";if(document.cookie.length>0){offset=document.cookie.indexOf(search)if(offset!=-1){offset+=search.length end=document.cookie.indexOf(";",offset);if(end==-1)end=document.cookie.length;returnvalue=unescape(document.cookie.substring(offset,end))}}return returnvalue}function close1(){if(persistclose)document.cookie="remainclosed=1"document.getElementById("iklankirikanan").style.visibility="hidden"}if(window.addEventListener)window.addEventListener("load",staticbar,false)else if(window.attachEvent)window.attachEvent("onload",staticbar)else if(document.getElementById)window.onload=staticbar
</script>
<br />
<div class="clear">
</div>
<div id="iklankirikanan">
<div style="text-align: right;">

<a href="" onclick="close1(); return false"><img src="https://blogger.googleusercontent.com/img/b/R29vZ2xl/AVvXsEhFTrAOMYkYvMFd6mkoD1tdkcXL96T5QmYbgBnkt4tMcCf3pfD8xJZRoqrlGbdnLMh0QSMRrDLndrL-NRAy3M9yBd22AxWgfn-1G4vao93mi7NrkuG0YHTvGNLEKTjtUMxtff5BnNoUNn2I/s1600/close-btn.png" /></a></div>
<div onclick='close1()'>
<div style="background: #fff;">
<a target="_blank" href="Link-Goals"><img src="https://blogger.googleusercontent.com/img/b/R29vZ2xl/AVvXsEiYKNJN8Nf6Axib6AXrwI1lX-dt0S7gxXljI9imBgGx2QoIix7x2HtNoALlXBqspH_QTGizapEqiEmWfsPXlpZZXEXDNJbHAPXtCy65xh6etGXm8vYfsXVZPEGdZIsgufyaki3IO-BnTMkT/s1600/ban-melayang.gif" style="border: none;" alt="Hanging Ads" /></a></div>
</div></div>
<style scoped='' type="text/css">
#iklankirikanan1{position:fixed;_position:absolute;top:0;left:0;width:160px;clip:inherit;_top:expression(document.documentElement.scrollTop+
document.documentElement.clientHeight-this.clientHeight);_left:expression(document.documentElement.scrollLeft+ document.documentElement.clientWidth - offsetWidth)}
</style>
<script type="text/javascript">
function get_cookie(Name){var search=Name+"="var returnvalue="";if(document.cookie.length>0){offset=document.cookie.indexOf(search)if(offset!=-1){offset+=search.length end=document.cookie.indexOf(";",offset);if(end==-1)end=document.cookie.length;returnvalue=unescape(document.cookie.substring(offset,end))}}return returnvalue}function close11(){if(persistclose)document.cookie="remainclosed=1"document.getElementById("iklankirikanan1").style.visibility="hidden"}if(window.addEventListener)window.addEventListener("load",staticbar,false)else if(window.attachEvent)window.attachEvent("onload",staticbar)else if(document.getElementById)window.onload=staticbar
</script>
<br />
<div class="clear">
</div>
<div id="iklankirikanan1">
<div style="text-align: left;">
<a href="" onclick="close11(); return false"><img src="https://blogger.googleusercontent.com/img/b/R29vZ2xl/AVvXsEhFTrAOMYkYvMFd6mkoD1tdkcXL96T5QmYbgBnkt4tMcCf3pfD8xJZRoqrlGbdnLMh0QSMRrDLndrL-NRAy3M9yBd22AxWgfn-1G4vao93mi7NrkuG0YHTvGNLEKTjtUMxtff5BnNoUNn2I/s1600/close-btn.png" /></a></div>
<div onclick='close11()'>
<div style="background: #fff;"><a target="_blank" href="Link-Goals"><img style="border: none;" src="https://blogger.googleusercontent.com/img/b/R29vZ2xl/AVvXsEiYKNJN8Nf6Axib6AXrwI1lX-dt0S7gxXljI9imBgGx2QoIix7x2HtNoALlXBqspH_QTGizapEqiEmWfsPXlpZZXEXDNJbHAPXtCy65xh6etGXm8vYfsXVZPEGdZIsgufyaki3IO-BnTMkT/s1600/ban-melayang.gif" width="160" height="600"/></a><p></p></div></div></div>

Note : Fill or Replace that I have put a Red color with the one that suits you.

Then Save Widget

A few articles that I can share this time about How to Add Banner Ads Hover on Right and Left on Blog. Hopefully with a short enough article this can be useful for you. Good luck.