Showing posts with label Tips. Show all posts
How to Fix Base System Device on Windows

How to Fix Base System Device on Windows

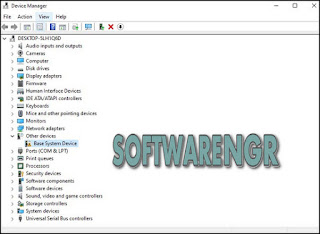
Did the weird “Base System Device” entry give you any warnings in your Device Manager? No need to worry, because here's how to fix the base system device on Windows. If you've just visited Device Manager and come across something called “Base System Device” that's giving you a warning, you probably don't know what it is. However, before you start fiddling with Device Manager, it's worth exploring what this mysterious device is and why it's there.

So, what is a “Base System Device”, and how to fix the warning it gives you in Device Manager?

What is a Base System Device?


Base System Device is a hardware component that is connected to the PC. For example, it could be a motherboard chipset, a Bluetooth transmitter, or an SD card reader.

How to Fix Base System Device on Windows

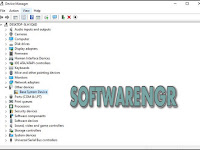
The reason it appears as “Base System Device” is because your system cannot properly interact with the device. This is usually because the computer does not have an official device driver to work with. The Base System Device that appears in your Device Manager usually has a small yellow exclamation mark and is usually categorized as Other devices.

How to Determine the Base System Device


Before you repair your PC to identify the mysterious Base System Device, you need to determine what device your computer is trying to recognize. In most cases, this is the chipset, Bluetooth, or SD card reader. Sometimes, installing a virtual machine on the PC can also cause this problem.

However, if you don't think any of those are the root cause of the problem, you should find the hardware ID. That way, you can then match the ID with the product and identify which device is causing your computer problem.

To do this, double-click on the Base System Device and switch to the Details tab in the Properties window. Click on the drop-down list under the Property header and select Hardware Ids.

How to Fix Base System Device on Windows

Take note of the Vendor ID and Dev ID. Vendor ID is 4 letters after VEN_ and Dev ID is 4 letters after DEV_. In our example above, the Vendor ID is 8086, and the Dev ID is 1911.

Now, you should check these numbers on a website like PCI Lookup. Click send after entering both IDs and it will look for the IDs to see if it can find the device.

How to Fix Base System Device on Windows

In admin's case, it's the chipset, but it could be different in yours. Once you find out which device is causing the problem, you can fix it.

How to Fix Base System Device in Device Manager


You can usually fix the Base System Device error by installing the appropriate device drivers. This then gives your PC something to work on and allows it to communicate with the right devices.

1. Manually Install Driver From Manufacturer's Website

The first method you have to download the correct driver from the device manufacturer. You can ask Windows to find drivers, but most likely this error is because Windows failed to find anything to download.

If you don't have the original driver disk for your device, try searching online for the device name or manufacturer. Then, go to the manufacturer's website and download the relevant driver. For example, if you want to install drivers for Intel-based chipsets, you can use Intel's Chipset Installation Utility.

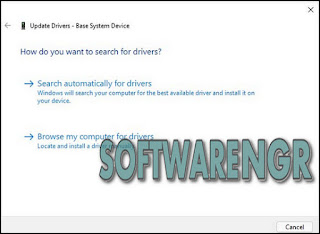
Once you find the appropriate driver, right-click on the Base System Device from the Device Manager and select Update driver. On the following screen, select Browse my computer for drivers and navigate to the folder where you saved the driver files. Select the driver and complete the steps for installation.

How to Fix Base System Device on Windows

2. Let Windows Find And Download Drivers

If you want to try the Windows automatic update feature, open the Update Driver menu as above. However, select Search automatically for drivers.

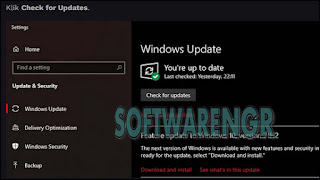
Windows will then look for the appropriate driver. If you find it, you can install the driver by following the setup steps that Windows has provided for you. If not, you can try running Windows Update to see if that helps.

Search in the Start Menu by typing Windows Update and run the Best Match. Click Check for Updates.

How to Fix Base System Device on Windows

Note that this will identify all available updates for your system. If there are several, you should look at the list of updates to verify if the driver you are looking for is there.

So that's how to solve the base system device in Windows. I hope you can determine the Base System Device on your PC, find the appropriate driver, and fix the problem.

If you can't fix the problem, it's possible that the problem is with the hardware. You can test it using hardware on different PCs. For example, you can plug the SD card into another PC and see if it works fine.

However, if you're having trouble updating or finding the right drivers, you might want to try a third-party driver update app.

So the article How to Fix the Base System Device in Windows. Look forward to other interesting articles and don't forget to share this article with your friends. Thank you…
Post bay : Software-ngr.blogspot.com
Remove Author Name and Post Date without Error Blog Data Structure

Remove Author Name and Post Date without Error Blog Data Structure

Remove Author Name and Post Date without Error Blog Data Structure - Each blog post certainly has an author or author who is responsible for the posts he made. Author posts are displayed on the blog page using meta tags which are the most basic SEO elements. For that the meta tag author is very important in the post.

The author's Meta tag cannot be removed from the post because if it is removed it will cause a data structure error that indicates the loss of the key element of a post.

But some bloggers have reasons to remove or delete the author's name and the date of posting on the blog. For example, with aesthetic reasons, omitting the author's name and posting date on the homepage to make the appearance of the post on the homepage simpler or eliminate the author's name and posting date on the static page to make it more neat.

Remove Author Name and Post Date without Error Blog Data Structure

But of course to remove the author name and date of this post can not be done just because it will cause an error in the blog data structure.

Previously I had made a post on how to remove the posting date on the blog and search results page, now I complete it by removing the author's name posting without the error of the blog data structure.

And in order to better understand this tutorial, you should also learn about Blogger conditional tags. And in this tutorial I combine it by removing the posting date.

Showing Author Names only on Index and Static Pages


This means that only displays the author's name on the posting page. Please copy the following code:

<b:includable id='author-post' var='post'>
<b:if cond='data:blog.pageType != &quot;item&quot;'>
<span class='post-author vcard' itemprop='author' itemscope='itemscope' itemtype='https://schema.org/Person'>
<meta expr:content='data:post.author' itemprop='name'/>
<meta expr:content='data:post.authorProfileUrl' itemprop='url'/>
<meta expr:content='data:post.authorPhoto.url' itemprop='image'/>
</span>
<span class="vcard">  <abbr class='fn' expr:title='data:post.author'/></span><abbr class='updated' expr:title='data:post.timestampISO8601'/>
<meta expr:content='data:post.timestampISO8601' itemprop='datePublished'/>
<meta expr:content='data:post.lastUpdatedISO8601' itemprop='dateModified'/>
</b:if>
<b:if cond='data:blog.pageType == &quot;item&quot;'>
<span class='post-author vcard' itemprop='author' itemscope='itemscope' itemtype='https://schema.org/Person'>
By: <span class='fn author'><a class='g-profile' expr:href='data:post.authorProfileUrl' itemprop='url' rel='author noopener' title='author profile'><span itemprop='name'><data:post.author/></span></a></span>
<meta expr:content='data:post.authorPhoto.url' itemprop='image'/>
</span>
<abbr class='updated' expr:title='data:post.timestampISO8601'/>
<meta expr:content='data:post.timestampISO8601' itemprop='datePublished'/>
<meta expr:content='data:post.lastUpdatedISO8601' itemprop='dateModified'/>
</b:if>
</b:includable>


Then please save the code below the following code:

<b:includable id='main' var='top'>
..............
..............
..............
</b:includable>

Then please change the code that displays the author's name on your blog template with the code below.

<b:include data='post' name='author-post'/>

And also delete the code that displays the posting date.

If in your blog template you use a conditonal tag to display the author's name for the index page, post page, and static page, please change everything with the code.

Remove Author Names on All Pages


Immediately, please copy the following code:

<b:includable id='author-post' var='post'>
<span class='post-author vcard' itemprop='author' itemscope='itemscope' itemtype='https://schema.org/Person'>
<meta expr:content='data:post.author' itemprop='name'/>
<meta expr:content='data:post.authorProfileUrl' itemprop='url'/>
<meta expr:content='data:post.authorPhoto.url' itemprop='image'/>
</span>
<span class="vcard">  <abbr class='fn' expr:title='data:post.author'/></span><abbr class='updated' expr:title='data:post.timestampISO8601'/>
<meta expr:content='data:post.timestampISO8601' itemprop='datePublished'/>
<meta expr:content='data:post.lastUpdatedISO8601' itemprop='dateModified'/>
</b:includable>


Then please save the code below the following code:

<b:includable id='main' var='top'>
..............
..............
..............
</b:includable>

Then please change the code that displays the author's name on your blog template with the code below.

<b:include data='post' name='author-post'/>

And also delete the code that displays the posting date.

If in your blog template you use a conditonal tag to display the author's name for the index page, post page, and static page, please change everything with the code.

But of course this is not absolute, every blog template can have different codes, so please adjust it to your blog's template if there is a change or inappropriate view.

Then please check the structure of your blog data here.

These are tips that I can share this time about Remove Author Name and Post Date without Error Blog Data Structure. Good luck and hopefully useful.
How to Maximize Your Income With NativeMedia

How to Maximize Your Income With NativeMedia

How to Maximize Your Income With NativeMedia - When it comes to reaching out to the masses and asking them for your quality products and services, it is important to target the right audience or visitors, analyze their buying habits, help them verify accounts, direct new customers to your financial applications and even help them find the best deals to buy their favorite brands, all of this is important that can be achieved with exceptional NativeMedia services.

NativeMedia with its data aggregation platform provides value customers and media partners for money-generating content and affiliate marketing programs. It provides access to text and feed advertisement solutions, coupon offers. If you have a website or are looking for effective strategies for the success of your website, then NativeMedia is a great solution to help you.

Even though you want to maximize revenue through coupons & offers and in-text advertisements, below are the two main products offered by NativeMedia, to increase your business to success and generate lots of coffers that keep flowing.

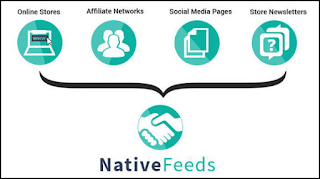
Native Coupon and Offer Data Feeds (Nativefeeds)!


As a provider of automated coupon content distribution, NativeMedia provides discounted data feeds and a powerful API coupon for all leading coupon websites, cashback websites, news media, industry-leading blog portals, coupon and application comparison sites. With a broad agreement aggregation platform, you will be able to see and access coupons & offers from hundreds of top brands in SEA and MEA. In other words, media partners and related data customers can take advantage of automated transaction distribution using XML, advanced APIs, CSV, and reliable JSON.

How to Maximize Your Income With NativeMedia

In addition, you will access online accounts for advanced data configurations such as advertiser selection, inside links and unique IDs.

Special Highlights of Original Coupon Feed Services

  • API Access: Using the most advanced technology, NativeMedia provides rich roburst access to its API.
  • Feed Format: Based on product requirements, this provides coupon data feeds in three main formats namely - CSV, JSON, and XML, so that only consumption of data feeds from your product.
  • Aggregation Deal: Get access to thousands of offers provided by the top networks from all over Asia
  • Account Access: Get access to online accounts where users can easily change various data including merchants, categories and networks, which they want to see.
  • Online Reports: Check click and sales performance reports made by your customers or visitors.
  • Quality content: Promote your business with bespoken content created at your request and published to attract the target audience.

IN-Text Native (Nativedeals) Advertising!


As the leading text advertising platform in Asia, NativeMedia with the NativeDeals service ensures you access thousands of major brands and online stores with one registration and implementation. This is a platform that you can easily monetize your business through thousands of keywords in your content.

With NativeDeals, you get access to online accounts that help you search for and full contact with all popular brands and online stores only with the NativeFinch code that is simple and easy to apply.

Special Highlights From Nativedeals!


Monetization Content

Well organized with advanced technology, NativeDeals collects advertisers from a performance-based advertising network to allow instant access to thousands of online stores and from various brands. Integrated technology converts keyword categories of content and brands into opportunities monetized into money. In addition, you will get:
  • Choose from various formats for ads
  • Engage with your target audience
  • Increase the value of your content with real-time keyword optimization
  • Save time and money with
  • Automatic in-text advertising

Comprehensive Reporting

With automatic in-text advertising, namely NativeDeals, customers will get insight into driving keywords and clicking content, sales, and prospects. This allows you to-
  • Choose a date period to understand customer buying trends
  • Know what consumers really like
  • Create content according to audience interest
  • Get clear visibility of the ad revenue generated

Creating Quality Content

With the advanced NativeDeals service, manual editing to convert keywords into in-text ads is deleted. That is, the brand, category, and product keywords are automatically converted into monetized links.
  • This creates interesting content
  • Save your valuable time
  • Single sign-up gives you access to several affiliate networks

So, this is an amazing NativeMedia service, which is curated according to the needs and monetization of your business. With great connections with Leading Media Platforms such as CollectOffers, Vouchercodes, CompareinAsia, and Shopcoins, this is a great opportunity for online businesses to maximize their revenues.
How to Create Your Own Forex Robot (Expert Advisor) Simply

How to Create Your Own Forex Robot (Expert Advisor) Simply

How to Create Your Own Forex Robot (Expert Advisor) Simply - Forex Robot, or better known as EA (Expert Advisor) is one of the strategic choices for some forex traders who do not want to monitor the market every day. To make a Forex Robot itself is not easy, because it usually requires knowledge of programming languages, as well as the ability to build a reliable trading system.

How to Create Your Own Forex Robot (Expert Advisor) Simply

However, there are other ways to make your own Robot simply, even if you don't know a particular programming language. First of all, first understand the definition of Forex Robot, then register what is needed to make the Robot itself.

What is a Forex Robot?


Forex Robot is a program (software) made with a special programming language so that the software can be associated with a trading platform. One example of this programming language is MQL (MetaQuotes Language) which is used to create robots on the Metatrader platform.

The Forex Robot function mainly has two: first, it allows software to monitor the market for 24 hours nonstop, and secondly, allows software to run transactions automatically based on the instructions mentioned in the manufacture. By making robots, traders no longer have to follow market movements throughout the day; Simply specify certain parameters on the Forex Robot, then let the Robot operate to generate profits for your coffers.
  • The trading opening signal (Open Order) via the technical indicator already on your Metatrader. You can also install other order conditions, including Take Profit instructions, Stop Loss, Trailing Stop, and so on.
  • If you want, you can also set certain limits to make the Forex Robot only operate on certain days or certain hours only.
  • You can also determine alternative scenarios, for example if a trading signal appears from the opposite direction while the previous trading position is still running, or apply the Martingale strategy when the trading position is losing.

All that can be done only by inputting the rules that you set yourself, then click "Generate"


How to Create Your Own Forex Robot Simply


However, there is one thing you need to remember. Forex special robots cannot adapt or build sensitivity to the market, and will always be rigid to follow the rules that have been inputted. That is, if there are sudden changes or anomalies in the market, the Robot can fail to produce as expected. In addition, trading using this Robot does not necessarily mean you can succeed without learning at all. You still have to continue to improve your knowledge about forex and improve the Robot regularly.

These are the tips that I can share this time, about How to Create Your Own Forex Robot (Expert Advisor) Simply. Hopefully it can be useful and good luck.
Multi Time Frame Trading Strategy

Multi Time Frame Trading Strategy

Multi Time Frame Trading Strategy - There are several reasons why traders use multiple time frames at once in an analysis. First of all, approaching analysis from a high to a lower time frame will provide opportunities without many obstacles, plus the ideal short-term trading setup.

In addition, finding a meeting of several resistance support from a variety of time frames is the most promising technical analysis tips to identify areas of supply and demand.

Multi Time Frame Trading Strategy

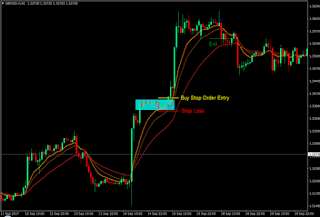
For example, you can start by looking at the Daily chart to identify the long-term trends that are currently prevailing in the market, whether bullish, bearish or sideways. You can find these trends from key technical levels (support resistance according to Price Action, Fibonacci, MA, etc.), or prominent patterns from Candlestick formations or price waves.

After finding a long-term trend, you can then go down to a smaller time frame, for example H4. Use the same analysis method as when you identify trends in the previous time frame, then observe how the results. If Daily and H4 reflect the same trend, then the base entry based on the trend will obviously be more promising, than you open the position from the analysis in just one time frame.

What needs to be noted, the core strategy of the multi time frame is finding confluence between the trends in the various time frames you use. So the key does not lie in the indicators or methods of technical analysis that you use.

Multi Time Frame Strategy for Risk Management


Another great benefit that you can get from the multi time frame strategy is the help of risk management that is more in line with the price opportunities on the chart. Usually, risk management is always adjusted to the tolerance of losses or the target of ideal profits according to your psychology as a trader. This is indeed not wrong, but sometimes it is not prospective because it does not take into account the price analysis in it.

So how do you manage risk with a multi time frame strategy? It's easy, you just need to adjust the Risk / Reward Ratio with the potential for price movements at a high time frame. Let's say you use the Daily chart to find out the long-term trend, then base the entry position on the H4 time frame, then setting the Risk / Reward Ratio can be based on the Daily chart.

For example, you open a position with a risk management rule that uses 1% of all capital, with Stop Loss 50 pips from the open position price on the H4 chart. If you see the possibility that the price can continue the trend as far as 300 pips on the Daily chart, then adjust the Risk / Reward Ratio with that opportunity. So, you don't use a 1:2 ratio, but 1:6.

Time Frame How Many Can Be Combined?


As with the principles that apply in almost all joints of life, "too much is not good". The same thing applies to the selection of time frames in this strategy. Generally, the ideal number that can be used is 2-3 time frames. How little?

Remember, the focus of this trading strategy is not how much, but how effective your method is. Even using 10 time frames will not guarantee your strategy is more profitable than those who only use 2 time frames.
In order for your strategy to remain effective no matter how many time frames it is, always keep in mind that a high time frame displays a major (long-term) price trend.

Regarding the selection of the right time frame, you can base it on your own trading system. For example, if you are a short-term swing trader, then you can use a combination of Daily and H4 like the example above. If you want to use 3 time frames, add Weekly charts above the Daily.

While if you are a mid-term trader, then use a combination of Weekly and Daily charts, with consideration of term analysis in the Monthly chart. On the other hand, for those of you who like short-term trading or scalping, then use the H4, H1 and M15 time frames. In analyzing, you should use the time frame in the order. Observing trends on the Daily chart then the entry position on the H1 chart is not recommended, because the distance that is too far away makes the relationship between price movements in both time frames irrelevant.

So a little discussion about tips on using a multi time frame strategy. Always remember that the core of this strategy is observing trends that confirm each other at various time frames. You can also use this method to adjust risk management with an accountable technique. Hopefully useful and good luck.
Simple Forex Strategy using Support Resistance

Simple Forex Strategy using Support Resistance

Simple Forex Strategy using Support Resistance - In trading it is certain that traders recognize support and resistance, to get to know what support and resistance are, we discuss more about what they mean.

Support is the price limit that is located below the price movement, while the resistance is the limit on the price located above the price movement. These support resistance limits have been formed due to traders' own thoughts. Where traders around the world often provide simultaneous responses where they determine that it is an overbought and oversold level.

Simple Forex Strategy using Support Resistance

It can be seen in price quotes on the market, why often prices bounce off each other at the level of support and resistance. This is because this thought continues to occur repeatedly, therefore making the situation on the market is like a straight line that limits the price movement. However, the movement of the price itself can be wherever they want, no one can manage it and limit it.

It's not just a straight line to determine resistance support, but you can also use the trendline. Because it can be pulled straight that at that point prices are often blocked and bounced back. If the line often reflects the price, the stronger the resistance support line.

There is a benefit to studying this support resistance, because this is a basic lesson for traders to apply technical analysis. Therefore many traders are able to gain a lot of profit using only this support resistance strategy. Because of these limits rational and become an ideal position to enter the market.

But if you want to analyze your resistance support to produce maximum profit, traders also have to understand the action and price action, so that traders do not misinterpret the transaction.

For price action at the support level there are two, namely Pullback and Breakout. This pullback has been explained above, where prices often bounce back at the level of resistance support. Breakout itself is a price event that is able to break the support resistance barrier.

So if the price manages to breakout support, then the broken support becomes resistance and the price looks for support below it again. Conversely, if the price breaks the resistance then the broken resistance becomes support and the price looks for the resistance above it again.

That's the tips that I can convey this time about Simple Forex Strategy using Support Resistance. Hopefully useful and good luck.
How to Play Forex for Beginners Without Capital

How to Play Forex for Beginners Without Capital

How to play Forex for beginners without capital - From time to time, how to play forex for beginners without capital is increasingly being cited as an easy and fast way to earn income online. However, actually investing in an online forex trading business is one business that requires a lot of basic knowledge and strategies, along with experience and strong mentality. Therefore, understanding what forex is something that must be done is really to invest in it.

How to Play Forex for Beginners Without Capital

Fortunately, there are currently many ways to learn what forex is and how to play forex for beginners without capital, so we don't have to spend a lot of money while still in the initial stages. In addition, everything can be done anywhere and anytime, provided we have an internet connection and adequate devices. How to? Well, on this occasion Forex Indonesia will present a review of what is forex, as well as tips on how to play forex for beginners without any capital.

What is Forex?


Forex is online forex trading without physical foreign exchange movements. Forex is different from Money Changer where currencies are exchanged directly with other currencies in cash. In forex trading, currencies are traded in pairs (for example), for example EUR / USD. Thus, the term "buy" in this pair in practice is "buy Euros and sell Dollars at the same time". Conversely, "sell" means "selling Euros and buying Dollars at the same time". We as traders can join forex trading by registering through a forex broker, making transactions via software provided by the broker, then if successful then we can benefit from price increases and decreases.

This pattern of trading makes forex traders able to get good profits when the value of a currency rises (strengthens) or decreases (weakens). Unique, isn't it? In addition, there are many advantages of forex. Among them:
  • Forex trading is done online, using a PC, laptop or smartphone. So, we can trade anywhere, provided there is a stable internet connection.
  • Forex trading does not need to provide millions of funds, because forex brokers have provided leverage facilities. For example, for example if leverage is 1: 100, the trader only needs to provide funds of 1 dollar to be able to trade for 100 dollars. In fact, currently brokers are trying to promote their services by providing training trading accounts for free. That is, we only need to register, then we can play forex without any capital at all.
  • Forex trading does not need an academic qualification or a specific job background. No matter whether we are only high school graduates, undergraduates, or housewives, everyone can trade forex, as long as they want to study forex diligently.

Basically, forex trading seeks to benefit from those movements. For example, if you estimate the EUR / USD will continue to rise, then we click the Buy button and place an order. If the graph really moves up and down, we will benefit. Conversely, if you expect the EUR / USD to go down continuously, then we click the Sell button and place an order. If the graph really goes down, we will profit.

However, the decision to buy or sell cannot be decided only with a hunch. Note that if the graph moves in the opposite direction to the estimate, then we can lose. Therefore, including in the important agenda how to play forex for beginners is to learn the basics of forex trading, technical analysis, and fundamental analysis. The basics of what forex trading will help beginners understand the terms encountered when playing forex, while technical analysis and fundamental analysis help to make estimates right before a Buy or Sell order.

Learn Forex Without Capital for Beginners


While still in the learning stage, you should take advantage of a demo trading account (Demo Account) provided by the broker for free. Steps:

  1. Prepare a PC or laptop, and a good internet connection. If you don't have a PC or laptop at all, you can use the internet cafe for a while. However, for the long term, it's better if you have your own device. Make sure you also have an active email address.
  2. Visit the site of one of the forex brokers. In order to learn how to play forex for beginners, you can choose any broker.
  3. Register or open a demo trading account (Demo Account). This is a trading account that contains virtual money (not real money), but allows us to see the real market conditions. Demo trading accounts are indeed designed as learning media for beginners, so that registration is free and does not require various conditions. Just click the register account demo button on the broker's site, then fill in the form provided. After registering, the broker will send a verification email and notification to your email. Just follow the process, until you get a link to download trading software that is usually called Metatrader4 (MT4).
  4. From the link provided by the broker, download and install the software to your PC or laptop. This is the reason why it would be better if you have your own device; because of course it will be troublesome if you have to download and install every time you switch devices, isn't it !?
  5. Use the ID and password that the broker has sent to your email address, to enter the trading software. Well, after that you will immediately see how currency pairs move up and down in the forex market.
  6. Through trading software, we see currency movements in graphical form. For example the chart on the EUR / USD currency pair moves up, so that means the Euro strengthens against the US Dollar. Whereas if the EUR / USD moves down, it means that the US Dollar strengthens against the Euro. Here you can understand what forex is by witnessing price movements on the international market.

How to Play Forex for Beginners Without Capital


Have you practiced on the Demo Account and want to try real trading? It's time to use the facilities to play forex without capital provided by forex brokers. However, because not all brokers provide this facility, it is necessary to search first on the internet.

Usually, providers of forex playing facilities without capital are only certain forex brokers who are holding two types of promotions:


No Deposit Bonus (No Deposit Bonus)


No Deposit Bonus is real money given by the broker directly after we register. However, these funds are available specifically to be used to play forex, so it usually should not be taken for granted. If we already trade with these funds and get profit, then the profits can be withdrawn. The size of the No Deposit Bonus from brokers varies greatly, ranging from $ 1 to $ 100. It's very small, but it's pretty good to try. How to register is usually the same as how to open a regular trading account.

Demo Trading Contest


Demo Trading Contest is a forex playing contest on a demo account, so it does not require capital at all. We only need to register and then try to win the race. Usually, the top five will get a cash prize that can be traded by the winners. Prizes range from $ 20 to $ 2000, so it is suitable as an alternative way to play forex for beginners without capital. To enter the contest, we only need to open a demo account. After winning, then for Real Account.

These two facilities are the best shortcuts among various ways to learn what forex is, because it doesn't require capital at all. It's just that, to be successful, perseverance and persistence are needed. There are no successful traders instantly; all of them need to learn step by step and never give up even though they experience a loss once. Losses are a reasonable part of the learning period. The key lies in capital management. If you are able to manage capital well and keep learning from mistakes, then the occasional loss can be ignored because long-term profits will be able to exceed it.

These are the tips that I can share about How to Play Forex for Beginners Without Capital. Hopefully it can be useful and good luck.
Basic Forex Trading Techniques for Beginners

Basic Forex Trading Techniques for Beginners

Basic Forex Trading Techniques for Beginners - The basic techniques of forex trading can be done in many ways, but which is the best for beginner traders? The most appropriate answer is certainly a simple strategy. If the technique is simple, will it be profitable later? Even though the masters always use complex strategies with sophisticated indicators? Believe it or not, many beginner traders are misguided by that perception. In fact, masters can be consistent profit because they have experience applying trading strategies correctly. In the hands of beginners, the masters' trading techniques certainly won't bring the same results.

Basic Forex Trading Techniques for Beginners

The key to success in trading does not lie in how well the strategy is used. Good or not trading techniques are relative, depending on the compatibility with the trader's style and how the trader uses it. Therefore, if you are a beginner, you should find a strategy that is easy to understand.

The Simplest Basic Forex Trading Techniques to Analyze Price Movements


Reading Trend


This forex trading technique for beginners is the basis of various strategies. So if you do not understand it, it is very likely that you will find it difficult to digest various ideas of forex trading strategies out there.

Basically, reading price trends is very easy. If the price looks strong then he is in a bullish trend. Conversely, when prices appear to decline, it means that a bearish trend is being formed. But to look for opportunities from price trends, further observation is needed, either by recognizing high low prices or using trend indicators as a tool.

In this case, a forex trading technique for beginners who can be relied upon is to read the trend with the trendline. Trendline can confirm the bullish trend when the line is below the price and is not broken by a pullback (temporary decline). If you use forex trading techniques for beginners who follow the trend (trend following), then look for buy opportunities from rebound prices after pullback. The opposite applies to bearish trend conditions.

In addition to trend following, the basic techniques of forex trading for beginners with a trendline can also be used in a trend reversal strategy. Trading opportunities in this case arise when pullback prices break the proven trend line, and show strong reversal signs. Indication of reversal can be obtained from confirmation of price action (closed price outside the trendline) or the influence of fundamental issues.

Recognizing Support Resistance


Support resistance is important levels that are universally used by all traders. Although the methods and indicators used to recognize them vary, support resistance is almost always present in the trader's analysis tool.

Forex trading techniques for beginners related to this can be done by identifying market conditions, then drawing lines of support resistance based on price patterns. If it is in a trending condition, support can be obtained through the withdrawal of the trendline which is below the price. To get resistance, just pull the second trendline above the price.

While if prices tend to move flat, the recommended forex trading technique for beginners is to connect low points as support, and high points as resistance. The way to read the opportunities of this strategy is that prices will adhere to the limits of support resistance as long as there are no significant changes that can shake price movements. So when the price drops to the support limit, an indication of the next movement is that prices bounce up, and vice versa when price increases touch resistance.

But there are times when the price breaks the support or resistance and there is a strong breakout. In this case, the broken support will be a new resistance, while the broken resistance will be a new support. It is better to be careful when trading when important news releases, because strong fundamental issues are usually the mastermind behind the price breakout of resistance support.

Identify Price Action


Price action is a price pattern reflected in the chart. Those who are accustomed to relying on price action don't even need to use indicators to read price movements. But if you are a beginner, you should use price action as a signal indicator confirmation.

The principle of basic trading techniques with price action is actually easy. Large candlesticks show market certainty, while small candlesticks with long axes reflect market uncertainty. Many traders use a small long-axis candle as a reversal confirmation if it is formed at a support or resistance level. Meanwhile, large candles are often used to confirm the strengthening of the price trend in a certain direction.

Actually there are lots of candle patterns with various forms and indications. But for the understanding of new traders, recognizing forex trading techniques for beginners with the above basic ideas can already be an introduction which in the future can be developed by learning other candlestick patterns.

These are the tips that I can share this time about Basic Forex Trading Techniques for Beginners. Hopefully with the tips that I submit, it can be useful for all of you. Good luck.
Create Ads Slots Before and After Posts

Create Ads Slots Before and After Posts

Create Ads Slots Before and After Posts - Actually the method is very easy, but for those of you who already know how to do it, you don't need to follow this method anymore because you have done this method before.

Create Ads Slots Before and After Posts

But, if you want to display ads, either banner ads or special AdSense ad units such as In-article Ads in the post, you can follow the tips I shared, about How to Create Ads Slots Before and After Posts. For more details, how to do it, you can immediately see the following steps.

How to Create Ads Slots Before and After Posts


First open the Blogger dashboard >> click the Themes menu and Edit HTML.

Then look for this code in the template

<data:post.body/>

Or

<p><data:post.body/></p>

More precisely, look for the code <data:post.body/> inside this markup

<b:includable id='post' var='post'>
....
....
<data:post.body/>....
....
</b:includable>

If in the template you have some code <data:post.body/> find the code that is wrapped with the conditional tag post page. Examples like this

<b:if cond='data:blog.pageType == "item"'>
<data:post.body/>
</b:if>

It can also be replaced with the Latest Blogger Conditional Tag format

If it's not there, you only need to add a new code like this

<b:if cond='data:blog.pageType == "item"'>
<data:post.body/>
</b:if>

Next add the code below to wrap the banner or ad code

<b:if cond='data:blog.pageType == "item"'>
<div class=khalista.blog'>
<!-- Your Ad Here --></div>
<data:post.body/>
<div class='khalista'>
<!-- Your Ad Here --></div>
</b:if>

Change the code marked with your banner or ad code. For example like this, here I use the AdSense In-article code.

<b:if cond='data:blog.pageType == "item"'>
<div class=khalista.blog'>
<ins class='adsbygoogle' data-ad-client='ca-pub-xxxxxxxxxxxxx' data-ad-format='fluid' data-ad-layout='in-article' data-ad-slot='xxxxxxx' style='display:block; text-align:center;'/><script>(adsbygoogle = window.adsbygoogle || []).push({});         </script></div>
<data:post.body/>
<div class='khalista'>
<ins class='adsbygoogle' data-ad-client='ca-pub-xxxxxxxxxxxxx' data-ad-format='fluid' data-ad-layout='in-article' data-ad-slot='xxxxxxx' style='display:block; text-align:center;'/><script>(adsbygoogle = window.adsbygoogle || []).push({});         </script></div>
</b:if>

Also add the CSS code below before </head> or &lt;/head&gt;&lt;!--<head/>--&gt;

<b:if cond='data:blog.pageType == "item"'>
<style type='text/css'>
.khalista{margin:20px auto 0 auto}
.khalista.blog{margin:20px auto}
</style>
</b:if>

Finish, click the Save theme button in the template editor.

Thus our tips about How to Make Ad Slots Before and After Fill in Posts on Blogger. Hopefully useful and good luck.
What is a VPN? 5 Best Free and Paid VPN Services

What is a VPN? 5 Best Free and Paid VPN Services

Best Free and Paid VPN Services. Since internet and smartphone users are increasing, VPN (Virtual Private Network) services or (Virtual Private Networks) are becoming very popular, although there are still not many people who know what VPN is, but the longer the graph of VPN users increases also increases day by day.

The use of VPN itself has many reasons, there are reasons to protect the privacy and security of our personal data, access to safer information, and a popular reason is to avoid censorship or freedom of access to restricted sites.

If you are currently looking for the best free or paid VPN service, then you are in the right place. In this article, I will explain what VPN is, why do you need a VPN? How do VPN work ?, and where is the best free and paid VPN service?.

What is a VPN and why is VPN important?


A VPN is a Virtual Private Network or virtual private network that helps you secure an internet connection and protect your identity.

The reason why we need to secure our personal data when online is because as we all do that everyone must use the internet on many devices, in several locations, and sometimes from public places that have public internet facilities such as parks, cafes, stalls and much more.

WiFi facilities in public places can be infiltrated by malware by hackers to gain access to your personal confidential information such as passwords, credit cards, search history, personal files, etc. These hackers can hack your social media profile, steal your bank account information, and more.

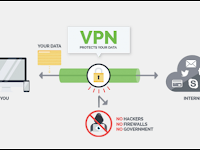
Even an internet connection in your home or office can be used to view data transferred to and from your device. And this is where the VPN functions, where VPN can secure your internet connection and protect your identity. By using a VPN, you can surf the internet personally using encryption and using IP addresses from various countries. This way you can also break through a variety of restricted sites that are included in the list of blocked sites on your network.

How do VPN work?


All of your internet traffic goes through various servers spread all over the world. This internet traffic can be spied on and infiltrated. Hackers or hackers and the government can see which websites you visit, and what you do online.

What is a VPN? 5 Best Free and Paid VPN Services

Whereas VPN creates a private network that functions as a point to show the network between your computer or device and your VPN server. When you request a website from your computer device that uses a VPN, your VPN client encrypts your request and then sends it to the VPN server.

The VPN server then requests information from the destination website and encrypts it before sending it back to your computer. This allows you to keep your internet connection always safe and far from the spies of hackers, your internet service providers, and even the government.

How do I Choose the best VPN Service?


There are many VPN service providers available that you can use. However, not all VPN services offer the same level of security, privacy and ease of use. And this is the reason why you need to find the best VPN service for you to use, and here are some important criteria that you need to know before you determine the best VPN service options:

Ease of use - You will need an easy-to-use application for all your devices, so you can quickly connect to your VPN, switch servers, change IP as easily as click without technical skills.

Speed ​​and Bandwidth - VPN services can be slow if they don't have enough bandwidth to support faster connections for all their customers. You must choose a company that has the infrastructure to support faster connections, even some of the best VPNs will increase your internet access speed compared to when you don't use a VPN service.

Location and Server - More servers in multiple locations means you can choose servers from different countries with different IPs. This also allows you to switch from a slower server to a faster one, or choose the server closest to your location.

Privacy and Security - You need to ensure that your VPN service provider offers the best layer of security to protect your privacy. This means they don't save your log and use an encryption layer for all data transfers. And below is a list of the best VPN services:

1. IPVanish


IPVanish is one of the most popular VPN service providers in the world today. IPVanish offers the easiest to use VPN service that can be used by beginners and experts.

Best Free and Paid VPN Services

IPVanish allows you to easily connect to their personal secure network. They have applications for all mobile platforms and desktop computers such as Mac, Windows, iOS, and Android. All of these applications are quite easy to use with a simple user interface. You can simultaneously use the same account with a limit of up to five devices at the same time.

They also have a large network of 40,000+ IPs together, 750+ VPN servers in more than 60 countries. You can use IP from various regions or countries. And the most interesting thing is that the IPVanish application can suggest you where the fastest server you can choose.

Because speed problems are an important problem for most users. IPVanish is definitely faster than most VPN service providers because of its strong network, bandwidth capacity, and better infrastructure.

IPVanish's security level is also very high, where they use encrypted connections with 256-bit AES encryption technology which is the highest industry standard. This allows unlimited P2P connections (used for torrent) without bandwidth limits. They also have no log policies recorded at all, which means they don't keep a record of your online activities.

Go to IPVanish

2. StrongVPN


StrongVPN is the best VPN service provider with more than 12000+ customers worldwide. Their network is spread in 24 countries and 47 cities.

Best Free and Paid VPN Services

StrongVPN offers the highest industry standard encryption without bandwidth limitations for all their accounts. They also offer StrongDNS services that allow you to access sites that are exposed to sensors without sacrificing speed or using encryption. You can use both services simultaneously for complete privacy, or you only use StrongDNS to access sites that are affected by sensors.

StrongVPN has a complete application for various devices with Mac, Windows, iOS and Android operating systems. All applications are quite easy to prepare and use even for ordinary users who don't really understand technology. And what's interesting about Strong VPN is that there is no limit to the number of devices that you connect with the same account, so you can use Strong VPN on all your devices.

Go to StrongVPN

3. ExpressVPN


ExpressVPN is another best VPN service provider with a strong network of 145 locations spread across 94 countries. They offer industry standard encryption to protect your privacy and keep your internet safe.

Best Free and Paid VPN Services

Express VPN has an easy-to-use application for all platforms and devices. It offers unlimited server replacement, allowing you to move from one geographic location to another by just clicking the button. You can simultaneously connect the internet with Express VPN to 3 devices using the same VPN account, which is lower than other VPN service providers on this list.

ExpressVPN allows you to use file sharing and P2P connections without limiting downloads or speed. They also have a policy of not having stored logs to ensure your privacy is maintained.

Go to ExpressVPN

4. Overplay VPN


OverPlay is another great VPN service that is great by bringing all the features you need for strong online security and privacy. Their large network consists of 650+ servers spread over 70+ locations in more than 50 countries.

Best Free and Paid VPN Services

They offer high-standard industry encryption to secure your internet access with a zero-log policy to ensure privacy is maintained. They also offer SmartDNS services that allow you to surf the internet without encryption. This is very helpful if you only try to access blocked websites.

Combining SmartDNS with a VPN service makes your internet connection safe and privacy protected without sacrificing speed even from a public WiFi point. OverPlay VPN also offers peer to peer connections without limits and bandwidth or unlimited downloads. OverPlay VPN also has applications for all popular devices and platforms.

Go to OverPlay VPN

5. Hide All IP


Hide All IP is software or software that serves to hide your IP, and this is software that can hide the best IP you can use.

Best Free and Paid VPN Services

With this Hide All IP software you will be protected from the threat of scouts and hackers on the internet when you surf because you are detected as anonymous and your online identity will not be detected. There are no logs saved and also protects you safely and without obstacles when you access using torrent.

Hide All IP works by hiding your real IP address and giving you a random IP address. The software will automatically change your original IP address to Hide All IP Private Server, so that what is received is a fake IP address and the internet traffic network route that you passed is encrypted by the server, making your browsing or internet surfing activities safe.

Go to Hide All Ip

For those of you who are not too concerned about security when surfing the internet, using a VPN is not necessary, but if you are a person who has personal data that must be protected, even you often use the internet to deal with the VPN so very important.

You can choose one of the best VPN services above for you to use. They all offer the best security, easy to use applications, large networks, and super fast speeds. And that's my review of VPN and VPN service providers. Hopefully this article is useful and useful for you. Good luck.
Overcoming Unreadable JS Codes and External CSS

Overcoming Unreadable JS Codes and External CSS

Overcoming Unreadable JS Codes and External CSS - Some time ago I saw there were some changes made by Blogger, such as in terms of UI, UX, and other aspects. In terms of UI, Blogger is now replacing the old look of the blog list to a more simple and practical form and of course that is a positive thing that Blogger gives to every user.

But from these changes, it also affects the codes that used to run normally in the template. Especially JS codes and external CSS that will not run if the link is not included with HTTP (Hypertext Transfer Protocol) or HTTPS (Hypertext Transfer Protocol Secure) on links linked in the template.

Overcoming Unreadable JS Codes and External CSS

In this post I will give you tips on How to Deal with Unreadable JS and External CSS Codes in Templates. The method is very easy, you just need to add "https:" on each JS and External CSS link in your template. Here's an example:

Initial link

<script src='//example.js'/>

Then add https: to the link above

<script src='https://example.js'/>

In the example below I took the external link code from the Simplify template (it can be different depending on the template used).

JQuery Library link


Link installed

<script src='//ajax.googleapis.com/ajax/libs/jquery/2.1.4/jquery.min.js'/>

Replace with this link

<script src='https://ajax.googleapis.com/ajax/libs/jquery/3.1.0/jquery.min.js'/>

Google Font Link


Link installed

<script type='text/javascript'>
//<![CDATA[
//CSS Ready
function loadCSS(e, t, n) { "use strict"; var i = window.document.createElement("link"); var o = t || window.document.getElementsByTagName("script")[0]; i.rel = "stylesheet"; i.href = e; i.media = "only x"; o.parentNode.insertBefore(i, o); setTimeout(function () { i.media = n || "all" }) }
loadCSS("//fonts.googleapis.com/css?family=Roboto:400,400italic,700,700italic");loadCSS("https://maxcdn.bootstrapcdn.com/font-awesome/4.6.0/css/font-awesome.min.css");
//]]>
</script>

Replace with this link

<script type='text/javascript'>
//<![CDATA[
//CSS Ready
function loadCSS(e, t, n) { "use strict"; var i = window.document.createElement("link"); var o = t || window.document.getElementsByTagName("script")[0]; i.rel = "stylesheet"; i.href = e; i.media = "only x"; o.parentNode.insertBefore(i, o); setTimeout(function () { i.media = n || "all" }) }
loadCSS("https://fonts.googleapis.com/css?family=Roboto:400,400italic,700,700italic");loadCSS("https://maxcdn.bootstrapcdn.com/font-awesome/4.6.0/css/font-awesome.min.css");
//]]>
</script>

Blogger comments column when not Google login


Link installed (search inside this code template)

http://ajax.googleapis.com/ajax/libs/jquery/1.7.1/jquery.min.js

Replace with this link

https://ajax.googleapis.com/ajax/libs/jquery/1.7.1/jquery.min.js

After that, save the template and see the changes on your blog. Now the blog will run normally again.

So simple tips from me about Overcoming Unreadable External JS and CSS Codes that hopefully will benefit you all. Good luck.
How to Send Money from PayPal to Payoneer

How to Send Money from PayPal to Payoneer

How to Send Money from PayPal to Payoneer - Having a Payoneer and PayPal account when running an online business related to receiving and making international payments is very profitable, with both online payment services making it easier for us to make transactions, quickly and easily when withdrawing funds to a local bank.

If you have both accounts and want to send or transfer money from PayPal to Payoneer then in this article I will share with you a step-by-step guide on how to transfer money from Paypal to Payoneer easily and surely succeed.

How to Send Money from PayPal to Payoneer

However, before you start the process step by step below, make sure you already have a Payoneer Account and make sure you have the balance available on your Paypal account for withdrawal to Payoneer.

How do I send Money from Paypal to Payoneer?


To make money transfers from PayPal to Payoneer is very easy, you only need a few minutes and your money will arrive in your payoneer account. Here are the steps

1. Enter your PayPal account. (Make sure you have funds or balances available in your PayPal account.)

2. Click the Payments menu to enter the Payments section.

How to Send Money from PayPal to Payoneer Step 1

3. Under the Bank section, Click Link "Link a New Bank".

How to Send Money from PayPal to Payoneer Step 2

4. In this step, select the "Checking" option which is the default option and then enter "Routing Number & Account Number" from your Payoneer Account Global Payment Service.

How to Send Money from PayPal to Payoneer Step 3

Note: You can get this Routing Number and Account Number information by logging in to your Payoneer account. Click the "Receive → Global Payment Services" menu and you can copy the routing number and account number in the USD currency section.

How to Send Money from PayPal to Payoneer Step 4

5. After you enter the Routing Number & Account Number from your Payoneer account, click on the "Agree and Link" button to link your Payoneer account with PayPal and then PayPal will send two payments for verification.

How to Send Money from PayPal to Payoneer Step 5

6. Please log in to your Payoneer account and enter the amount of payment transferred from PayPal to your Payoneer in the PayPal verification box to confirm that the Payoneer account is truly yours. If appropriate, the process of connecting your Payoneer account to your PayPal account ends successfully.

After your PayPal account is connected to Payoneer and confirmed, you will be able to transfer money from PayPal to Payoneer easily and quickly. See the screenshot below which proves the money transfer from PayPal in a Payoneer account.

How to Send Money from PayPal to Payoneer Step 6

And that's a step-by-step guide to sending money from PayPal to Payoneer, you will be able to easily transfer & withdraw funds from your PayPal account to a Payoneer account. Hopefully with these tips, it can be useful for you and good luck.
Can Youtube Adsense Accounts be Installed on Blogspot?

Can Youtube Adsense Accounts be Installed on Blogspot?

Can Youtube Adsense Accounts be Installed on Blogspot - Adsense tips next time will discuss a question about whether to install an adsense account from Youtube to Blogspot/Blogger? This is of course related to changes to Google's current policies. Actually, a few years earlier, to link between Google Adsense accounts from Youtube or Blogspot/Blogger can be linked to each other. That is, an Adsense account from anywhere can be installed on both.

Can Youtube Adsense Accounts be Installed on Blogspot?

However, a few years later the rules were changed. Adsense accounts that are registered via Youtube, can no longer be installed on Blogger or Blogspot, and vice versa. Unless the Adsense account has a non-hosted Adsense account status.

One easy trick to get an Adsense account, which is to register via Youtube


Most certainly agree to get one Adsense account that is difficult not to play, especially for beginners. Let alone to get an Adsense account Non-hosted Adsense Hosted accounts are fairly difficult to obtain.

This is compounded by the requirements that must be met by the blog. A blog cannot be registered directly. At least some specific processes and achievements need to be met first. Starting from the navigation of the blog template that must be clear (not the beta version of the blog), you must really have enough visitors, articles or posts with a certain amount, level of induction (ranking) in search engines that must be adequate, and so forth.

As if that requirement was felt to be insufficient, to wait for confirmation also needed to wait several days, even weeks.

That way, it's no exaggeration to say that registering Adsense from a blog is very difficult to accept. An easier alternative to get an Adsense account is to monetize videos on Youtube. Because it is trusted, to get a Google Adsense account from Youtube is quite easy.

The requirement is not as much and as hard as registering Google Adsense with a blog. What is needed is as follows:
  • One Google email that was not registered for Google Adsense before
  • Make a Youtube channel
  • Upload original (homemade) videos on a Youtube account
  • Register your Adsense account directly from the Youtube channel by linking it through the button provided

After that, please wait a moment. Some cases have been registered and received with less than an hour. Google Adsense account is ready to use, with Hosted status. This means that it cannot be installed on Blogspot / Blogger and can only be used to monetize Youtube videos.

Then, can a Google Adsense account from Youtube be linked or posted to a blog?


The answer is of course CAN. To ensure that, please find the answer further in the "Google statement" on their support page. But the requirement is that the Adsense account must be upgraded first to a Non-hosted account.

To upgrade the Adsense Hosted account to become Non-hosted, you need to bother a little by providing a Top Level Domain (TLD) blog or website, aka already having a personal domain, not dot blogspot dot com anymore.

If you already have a TLD blog, please do the following steps:
  • Visit the official "Google Adsense" link, log in with an Adsense account from Youtube
  • Click the gear icon, select after or settings
  • Select the menu and click Access and authorization
  • In the show ads section on other websites, please fill in the domain URL (TLD) that you want to display Adsense ads
  • Then press the Send button
  • Next you are asked to make one ad slot and install the ad code on the blog that you registered earlier.
  • Finally, you need to wait for a review from Google about the submission. It usually takes several days, even weeks.

At the review stage, you need to do special treatment on the blog or website that you registered, so that your request can be approved immediately.

If your blog / website is considered eligible to display Google Adsense ads, then the blog will immediately be accepted. In other words, it can be ascertained that the Youtube Adsense account that was originally Hosted will change its status to Non-hosted.

So information about Adense tips this time about Is an Adsense Youtube Account installed on Blogspot? Hopefully useful and good luck.
How to Embed Google Drive Videos with HTML5 Video Elements

How to Embed Google Drive Videos with HTML5 Video Elements

How to Embed Google Drive Videos with HTML5 Video Elements - Previously we already knew how to embed videos uploaded on Blogger to be responsive by using HTML5 video elements. Well this time we will also use the same trick that is how to embed videos from Google Drive using HTML5 video elements and of course responsive.

Why bother using HTML5 video elements, does Google Drive already provide an iframe embed code? Maybe this question is in some Bloggers who often use Google Drive.

How to Embed Google Drive Videos with HTML5 Video Elements

As we all know that Google Drive has indeed provided an embed code with an iframe, but there are a few that block it for me especially if it is used to embed videos. That is, we have to click 2 times to play the video and there is a link icon to preview the video to Google Drive on the top right of the player which is enough to interfere with the player's display.

With HTML5 video elements, we can make it easier for custom players for Google Drive videos. But to be able to use HTML5 video elements for Google Drive videos, we must use the Google Drive API key for video sources.

How to Create a Google Drive API key


Please create a Google Drive API key with the following steps:
  • Please enter the Google API Console
  • Then please click the Create Project button
  • After the new project is successfully created, please select the Google Drive API then click the Enable button.
  • Then please click the Create Credentials button.
  • For optics Which API are you using? Please select the project that we created earlier. For the option Where will you be calling the API from? Please select the Web server (e.g. node.js, Tomcat). Then check User Data and click the What do I need credentials button?
  • Then click the Create OAuth client ID button.
  • Add Name to Product Name then click the Continue button then click Done.
  • Then please click the blue Create Credentials button on the Credentials tab then select API key. Please copy the API key code provided and note it in notepad.

Until here we have successfully created the Google Drive API key, then follow the next steps to embed the Google Drive video in the post.

And here is how to embed videos uploaded on Google Drive to be responsive by using HTML5 video elements.

How to Embed Google Drive Videos with HTML5 Video Elements


1. For Non Amp blogs

Please add the following CSS in your blog style. If you have previously stored CSS like this, then please skip this step.

.video-responsive {
  position: relative;
  padding-bottom: 56.25%;
  height: 0;
  overflow: hidden;
}
.video-responsive video {
  position: absolute;
  top: 0;
  left: 0;
  width: 100%;
  height: 100%;
  border:0;
}

And use the following code to display videos from Google Drive in the post.

<div class="video-responsive">
<video controls>
 <source type="video/mp4" src="https://www.googleapis.com/drive/v3/files/FileID?alt=media&key=GoogleDriveAPIkey">
</video>
</div>

Please replace the FileID with the code from the Google Drive file share URL like the following example that I marked and make sure the file is Public on the web.

https://drive.google.com/file/d/0Bz4YdwRI3rnCYkdjamNpTEs5bz/view?usp=sharing

Then the writing GoogleDriveAPIkey please replace it with the Google Drive API key that was created.

2. For AMP HTML blogs

Please install the following amp-video js in editing the HTML of your blog, if it already exists then you don't need to install it again.

<script async="" custom-element="amp-video" src="https://cdn.ampproject.org/v0/amp-video-0.1.js"></script>

Then please use the following code to display the video in the post.

<amp-video width="480" height="270" layout="responsive" controls>
   <source type="video/mp4" src="https://www.googleapis.com/drive/v3/files/FileID?alt=media&key=GoogleDriveAPIkey">
  </amp-video>

Please replace the FileID with the code from the Google Drive file share URL like the following example that I marked and make sure the file is Public on the web.

https://drive.google.com/file/d/0Bz4YdwRI3rnCYkdjamNpTEs5bz/view?usp=sharing

Then the writing GoogleDriveAPIkey please replace it with the Google Drive API key that was created.

Here I don't include the demo, but I've tried the codes above and it runs perfectly.

That's the tip I can share this time about How to Embed Google Drive Videos with HTML5 Video Elements. Hopefully this tutorial can be useful for you and good luck.